User guide
Table of contents
How to contact support
Can't find what you're looking for in this guide?
Contact support by filling out this form or by emailing support@bluink.ca.
Helpful videos
- eID-Me registration tutorial and ID verification demo
- eID-Me liveness check demo
- eID-Me digital ID explained by the Bluink team
Overview
eID-Me is a mobile device-based digital identity that gives you secure control of your identity.
During registration, you use your mobile device to prove your identity by taking a selfie with liveness check, and scanning your government-issued photo identity documents (e.g., driver’s licence, passport). Your mobile device is then issued a unique eID-Me digital identity, which includes a digital certificate with identity claims (verified pieces of information about you).
You can then use your eID-Me digital identity to easily access services and securely share identity information in identity transactions both online and offline (in person).
eID-Me can save you time and trouble wherever your identity needs to be verified.
eID-Me is private
Your identity information is always in your possession on your mobile device. It is never hosted by a centralized service or third-party provider or stored in the Cloud. Once your identity information is verified, a secure certificate is installed on your mobile device. That information is not accessible to anyone but you, until you choose to share it in an identity transaction.
Identity transactions let you securely share your verified identity information with trusted organizations (relying parties) in exchange for access to their services (e.g., government benefits, credit card applications, check-in at a new medical clinic).
You can initiate identity transactions online by providing your eID, which acts as an anonymous username, on a relying party’s website. You can also initiate identity transactions in person by selecting a button in the eID-Me app to connect to a relying party’s system over an encrypted Bluetooth connection.
This prompts the relying party’s system to send an identity request to your mobile device. Identity requests always show you which relying party is requesting your information and exactly which pieces of information they are requesting. You can also choose to provide any additional optional information, or deny the identity transaction completely if you feel the relying party is asking for more information than you wish to share.
Traditionally, people had to reveal more personal information than necessary because identity information was grouped together on ID cards (e.g., age, name, and address on a driver’s licence). With eID-Me, if a relying party needs to verify your age, you can share just your age. Your name, address, and other information remains private. Manage your identity by choosing what information to share.
eID-Me is convenient
eID-Me lets you easily prove your identity to access government, financial, health care, and other ID-enabled services anytime, anywhere, and in minutes, not weeks.
Unlock your eID-Me app with the authentication method (e.g., Face ID/Face Unlock, PIN, etc.) you use to unlock your mobile device. Log in to websites password-free by sending identity requests to your mobile device. Share verified identity information without filling out long forms (and without typos).
eID-Me is secure
Your eID-Me identity is secured in a digital wallet within your eID-Me app. Your identity information is protected using AES 256-bit encryption and the strongest security mechanisms available on your mobile device.
Instead of an online database that contains everyone’s identity information, your identity information is only stored on your mobile device. There is no centralized storage of information, which means there is nothing for hackers to target.
During identity transactions, your identity information is protected with strong public key cryptography to ensure your information is only shared with the relying party you intend to share it with.
Getting started
Requirements
Currently, to register for eID-Me, you will need:
- An iOS mobile device (with iOS 15 or later) or an NFC-enabled Android mobile device (with 8 or later). To enable NFC (near-field communication) on Android, open the Settings app and select “Connected devices” or a similar option like “Wireless & networks,” “Connections,” or “NFC,” and turn on NFC.
- An email address.
- Access to the App Store or Google Play Store.
- One or more government-issued photo IDs.
- Driver’s licence
- Photo ID card
- Services card
- Recommended: use a passport to maximize your chances of passing identity verification and allow more services to recognize and trust your identity.
To obtain an eID-Me digital identity, you must download eID-Me from the App Store or Google Play Store and register your mobile device.
To register your mobile device, open the eID-Me app and follow the on-screen instructions.
Watch the eID-Me registration tutorial
Click here to watch the eID-Me registration tutorial.
Enable your mobile device’s authentication method (and never disable it)
Important: Ensure your mobile device’s authentication method (e.g., Face ID/Face Unlock, PIN, etc.) is enabled and never disable it.
If you disable it, your eID-Me data will no longer be accessible, and you will not be able to regain access, even if you re-enable it.
eID-Me uses the authentication method you use to unlock your mobile device to lock your eID-Me app, encrypt your eID-Me data, and hide your sensitive information.
We recommend using the strongest authentication possible. A convenient and strong authentication method is to use your biometric scan (face or fingerprint) and set a passcode composed of four words (with at least one unique word), using a mix of uppercase and lowercase letters, a number, and a symbol. Example: DeepBlue7PterodactylFrienD&. This technique generates passwords that are relatively easy to visualize and remember.
Enter your email address
You will need to enter your email address to register for an eID. To save time, enter an email address that you have connected to an email app on your mobile device. If you received an email invitation to use this app for identity verification, you must use the same email address that the invitation was sent to. Once you have entered your email address in the eID-Me app, open your email app, and open the email with the subject line: “Welcome to eID-Me” (sent by no-reply@eid-me.com). Select the blue “Register now” button. It should redirect you to the eID-Me app to proceed with registration.
If you provided an email address that is not connected to an email app on your mobile device, you will need to manually input the registration code into your eID-Me app (see the next section).
Manually input registration code
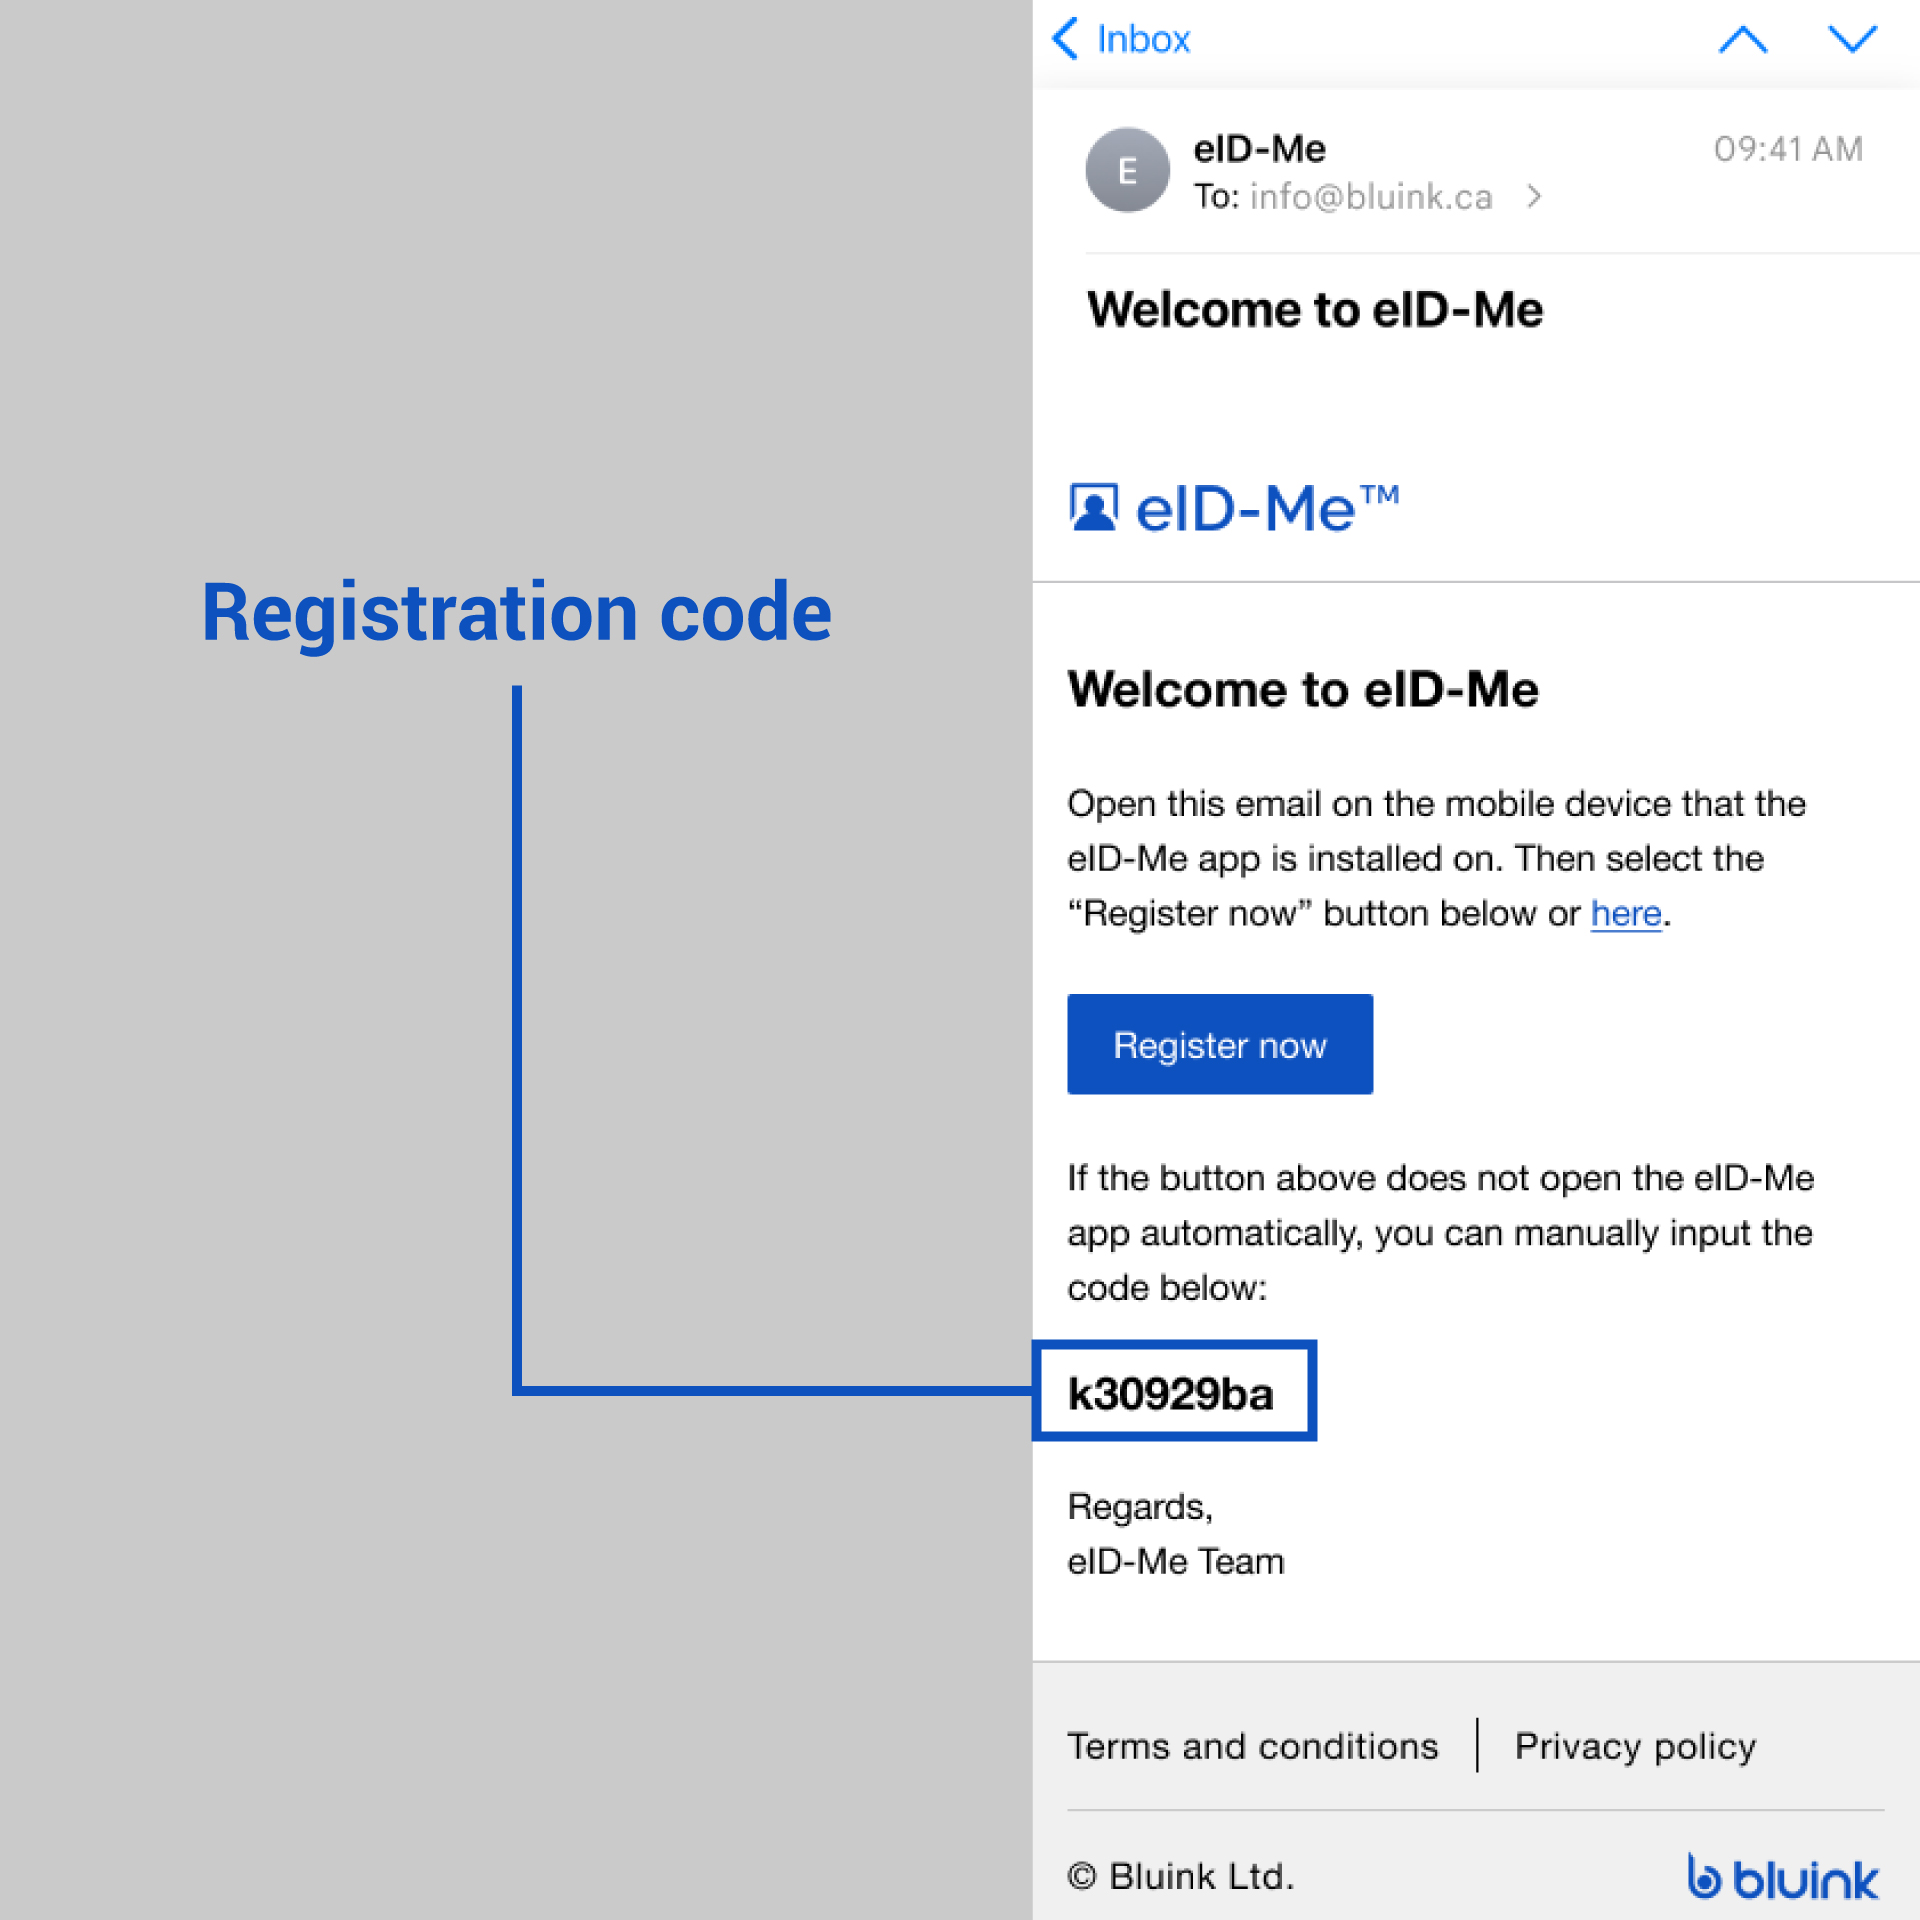
eID-Me registration code
Go to a computer or alternate mobile device, open your email app, and open the email with the subject line: “Welcome to eID-Me” (sent by no-reply@eid-me.com). Find the registration code in bold at the end of the email (see the image above). Manually input the code onto the dotted line provided on your eID-Me app.
You are now ready to start identity verification.
Resend email
Your registration code email may take a few minutes to be received. Please be patient, and check your spam folder if you do not receive it. You may request a new email after 5 minutes. There are a limited number of registration code emails that you can request. Once you have reached the maximum number of registration code emails, you can no longer request new emails. Please return to the previous screen to enter the code from the last email that you received.
Identity verification
Identity verification is the process of verifying your identity based on presented evidence. This process is performed remotely, in a self-serve manner, from your mobile device.
The remote identity verification process involves taking a selfie with liveness check, scanning identity documents, and submitting the information to the eID-Me Canadian resident servers for verification. We need your information for identity verification before you receive a digital identity. Your selfie is compared against your identity card or passport photo. Your mobile device location is compared against your home address. These checks ensure that you are not an imposter. This information is processed by our eID-Me servers and then erased. Read our privacy policy.
What you will need to get started
In the current version of eID-Me, to perform identity verification, you will need:
- One or more government-issued photo IDs.
- Driver’s licence
- Photo ID card
- Services card
- Recommended: use a passport to maximize your chances of passing identity verification and allow more services to recognize and trust your identity.
You may also choose to scan your Ontario or Quebec health card to add your health card information to your eID-Me app.
Selfie with liveness check
Watch the liveness check demo.
You must enable access to your mobile device’s camera because your portrait images on your identity documents need to be verified against your selfie via a biometric match. Your photo is only accessed once during registration, and will not be displayed anywhere in the app nor saved after registration. Camera access can later be disabled.
The capture process has instructions to follow to prove that you are taking a live selfie. These instructions are simple and appear in front of the camera image during the selfie capture. At the same time, some simple graphics also accompany the instructions to help guide you.
The selfie capture process will fail if your face is not in the frame at all times. You must also ensure that only one face is visible, and that the background is clear of other people.
Here are some suggestions to improve liveness check results:
- Ensure your face is in the frame at all times. An overlay graphic on the capture view will help you guide your face to the correct position.
- Ensure your face is the only face visible. No one else or any object should be in the frame.
- Ensure there is adequate lighting. The capture process may also fail if the lighting is too dark. The camera flash is not recommended to be used because this will cause glare, so you must find a location where there is good lighting.
- Ensure there is no glare from strong light sources. The capture process may fail if there are reflections or glare from strong light sources. Try to position yourself to remove any glare from the capture process.
- Ensure that the mobile device’s camera lens is clean. Dust or grime on your mobile device’s camera lens will impede eID-Me’s ability to accurately capture your selfie. The lens can be cleaned by gently wiping it with a microfibre cloth.
- Ensure there is nothing obstructing your face. Remove strands of hair obstructing your view, glasses (as they may cause glare), and big accessories to improve the camera detection.
Scanning identity documents
During identity verification, the information that you scan from your identity documents with your eID-Me app is securely stored on your mobile device.
When this information is submitted to the eID-Me servers for verification, the information is erased after each attempt to pass identity verification.
When the identity verification passes, your submitted information is transformed into a digital identity, installed on your mobile device, and then erased on the servers. This information is also encrypted so that only your mobile device can decrypt it.
If you do not complete the identity verification process, the scanned information is retained on the eID-Me servers for a maximum of two hours, before being erased.
Scanning your identity cards
Both the front and back of identity cards are captured and processed to extract the information on them.
Here are some suggestions to improve scanning results:
- Ensure the indicated side of the identity card is showing.
- Ensure your identity card is clean. eID-Me processes fine details on your identity cards such as the portrait photograph, logos, and 2D barcodes. Dirt or damage on the card may cause the capture process to fail.
- Ensure the card is placed against a contrasting background. The background surface should be clear of any clutter.
- Ensure there is adequate lighting. The capture process may also fail if the lighting is too dark. The camera flash is not recommended to be used because this will cause glare, so you must find a location where there is good lighting.
- Ensure there is no glare from strong light sources. The capture process may fail if there are reflections or glare from strong light sources. Try to position yourself to remove any glare from the capture process.
- Ensure that the mobile device’s camera lens is clean. Dust or grime on your mobile device’s camera lens will impede eID-Me’s ability to accurately process some of the fine details of your identity documents. The lens can be cleaned by gently wiping it with a microfibre cloth.
Scanning an address sticker
If you have moved, you may receive an address sticker (with your new address) to place on your identity card. An updated address is needed to ensure a successful identity verification.
Here are some suggestions to improve scanning results:
- Ensure the address sticker is centred to the scanning area.
- Ensure the card with the address sticker is placed against a contrasting background. The background surface should be clear of any clutter.
- Ensure there is adequate lighting. The capture process may also fail if the lighting is too dark. The camera flash is not recommended to be used because this will cause glare, so you must find a location where there is good lighting.
- Ensure there is no glare from strong light sources. The capture process may fail if there are reflections or glare from strong light sources. Try to position yourself to remove any glare from the capture process.
- Ensure that the mobile device’s camera lens is clean. Dust or grime on your mobile device’s camera lens will impede eID-Me’s ability to accurately process some of the fine details of your identity documents. The lens can be cleaned by gently wiping it with a microfibre cloth.
Enter your mobile number
You may be requested to enter your mobile number during registration. The mobile number is used to verify your information against mobile carrier records. This is an additional check required by the organization that is requesting your information, to increase the level of identity assurance.
Scanning your passport
eID-Me only supports e-passports, which are passports with an embedded electronic microprocessor chip, containing information. You can tell if your passport has this capability by ensuring that it has the following biometric symbol printed on the front cover.
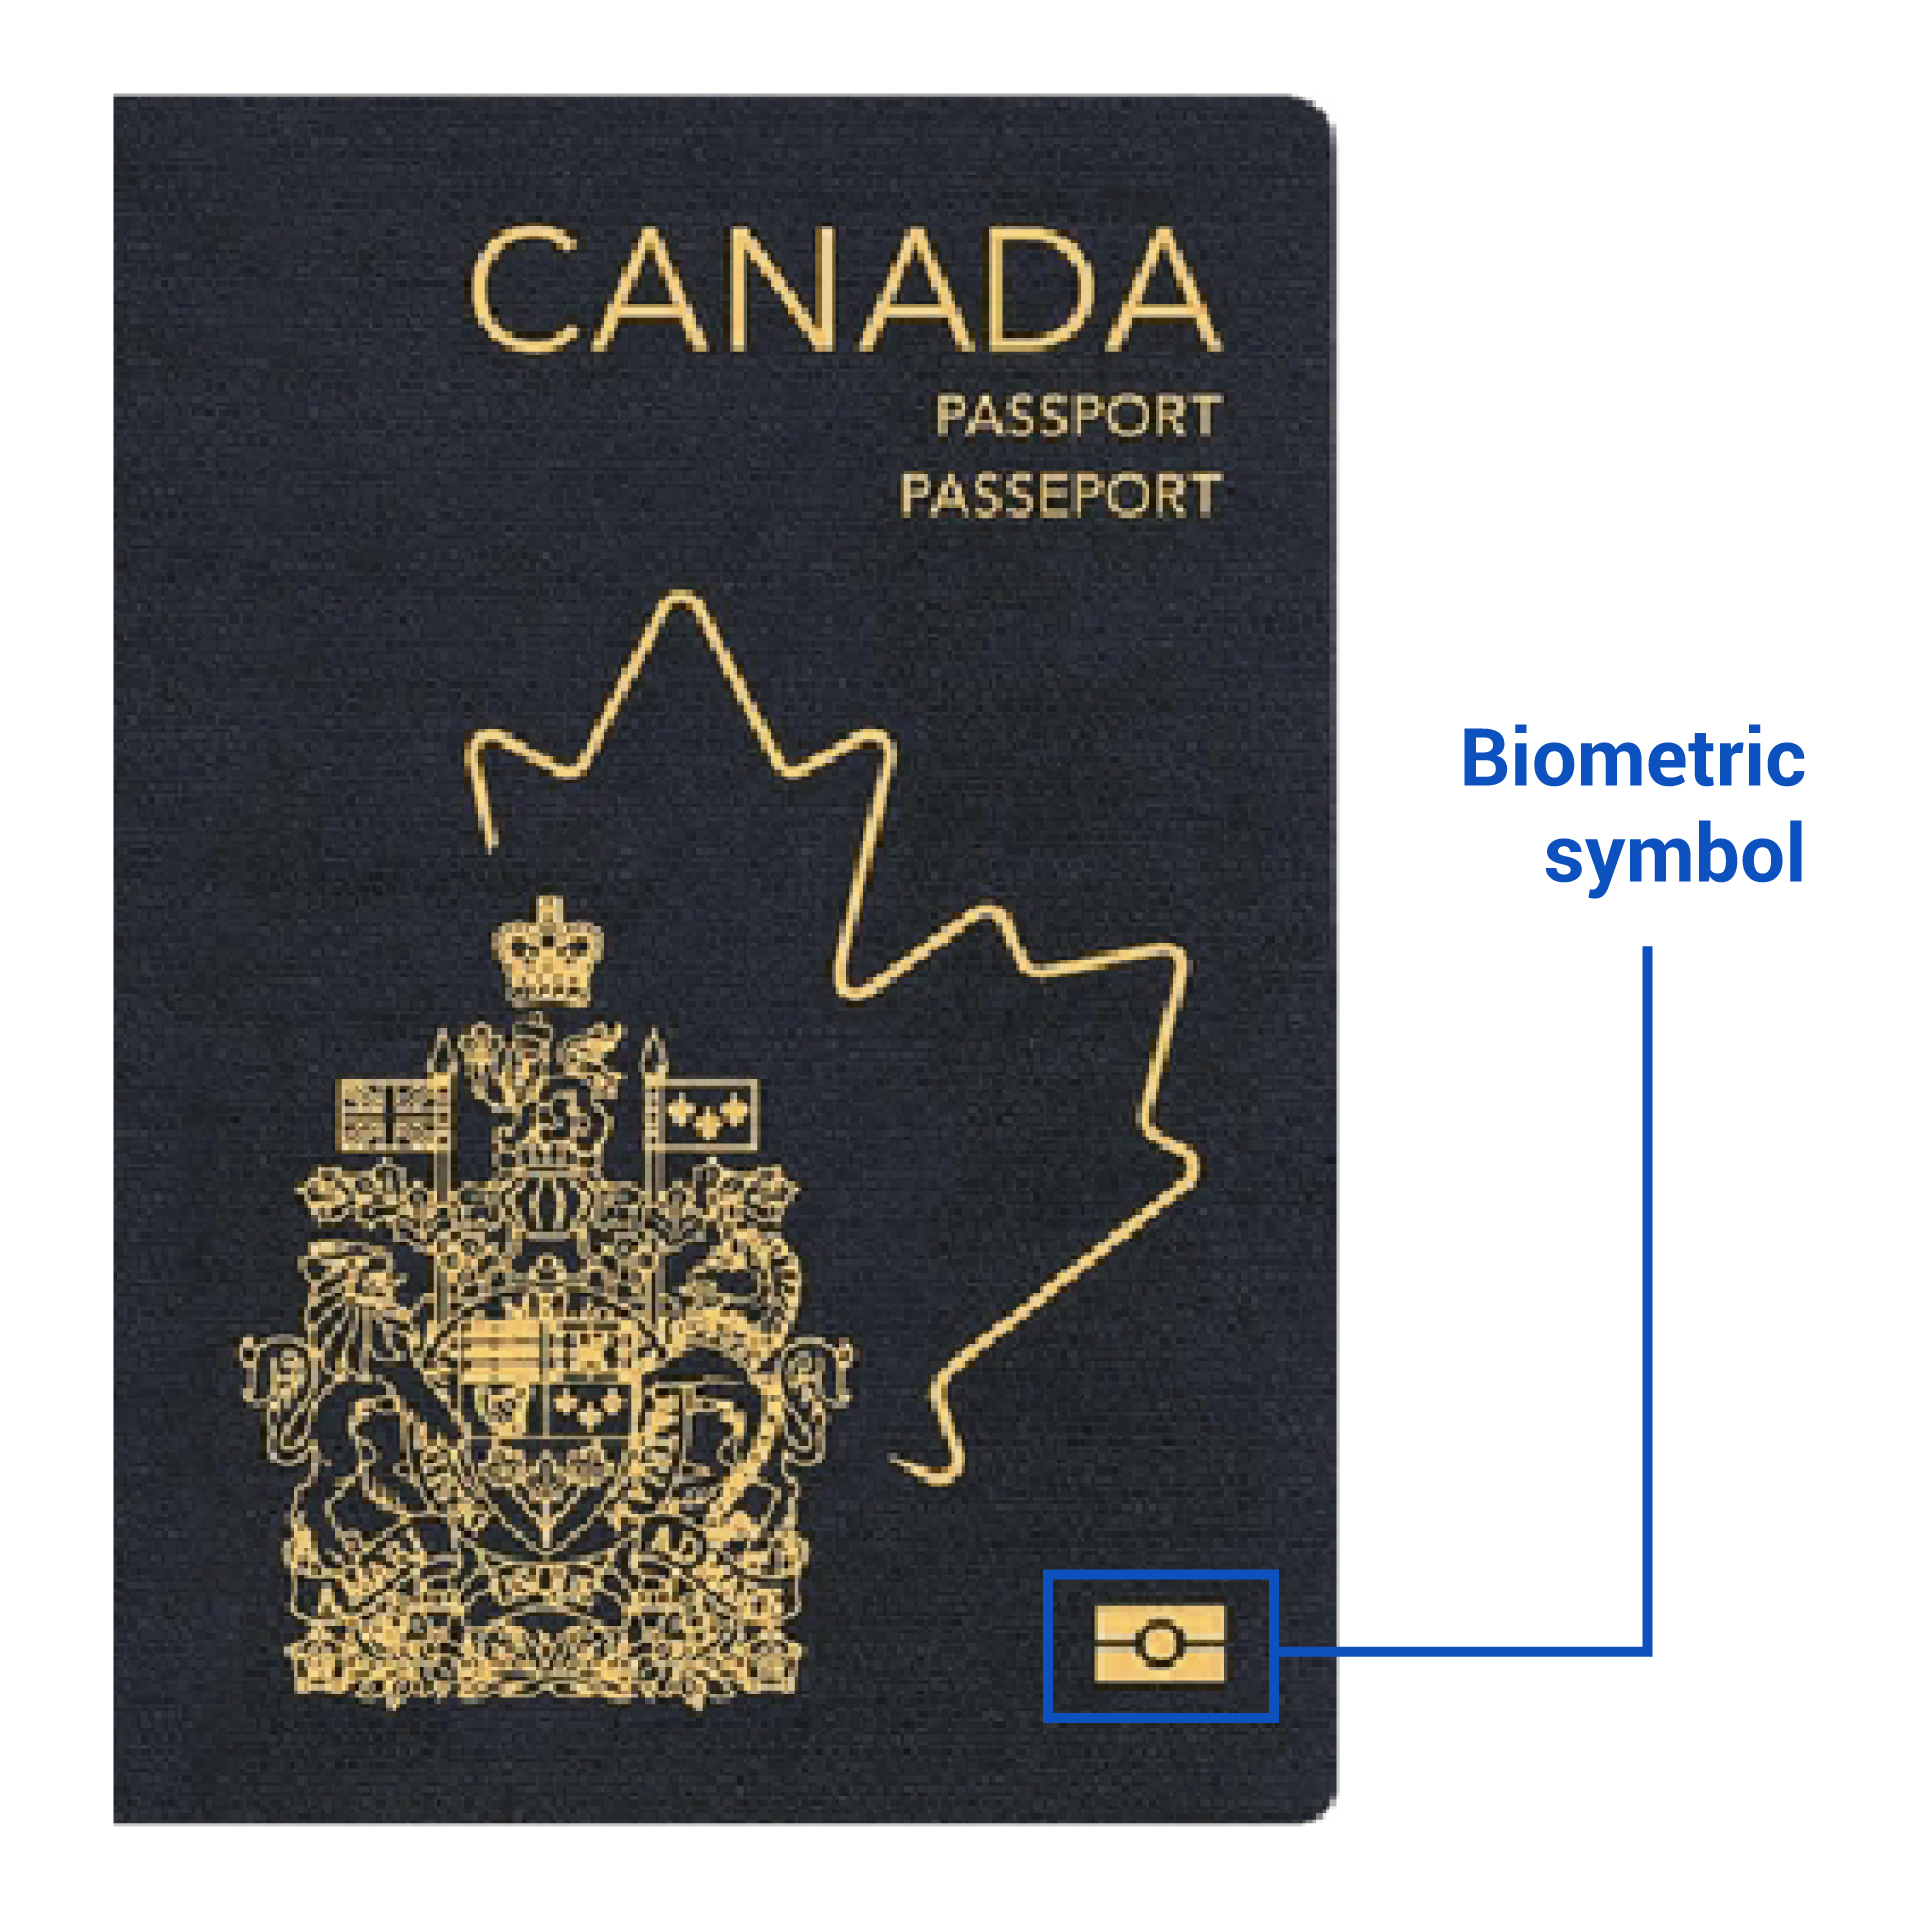
Passport biometric symbol
There are two types of scans that must be done to capture the information from a passport. The first scan uses your mobile device’s camera to process the Machine Readable Zone (MRZ) on your passport’s photo page. The MRZ on a passport is the area at the bottom of the photo page where two lines of text are located. The MRZ must be scanned to allow access to data contained within the passport chip. The second scan uses your mobile device’s NFC (near-field communication) to read the information from your passport chip.
The following suggestions will help maximize your chances of successfully completing both types of scans of the passport.
Scanning your passport’s photo page
The MRZ is located near the bottom of the photo page of your passport. It consists of two lines of alphanumeric text with filler characters (<).
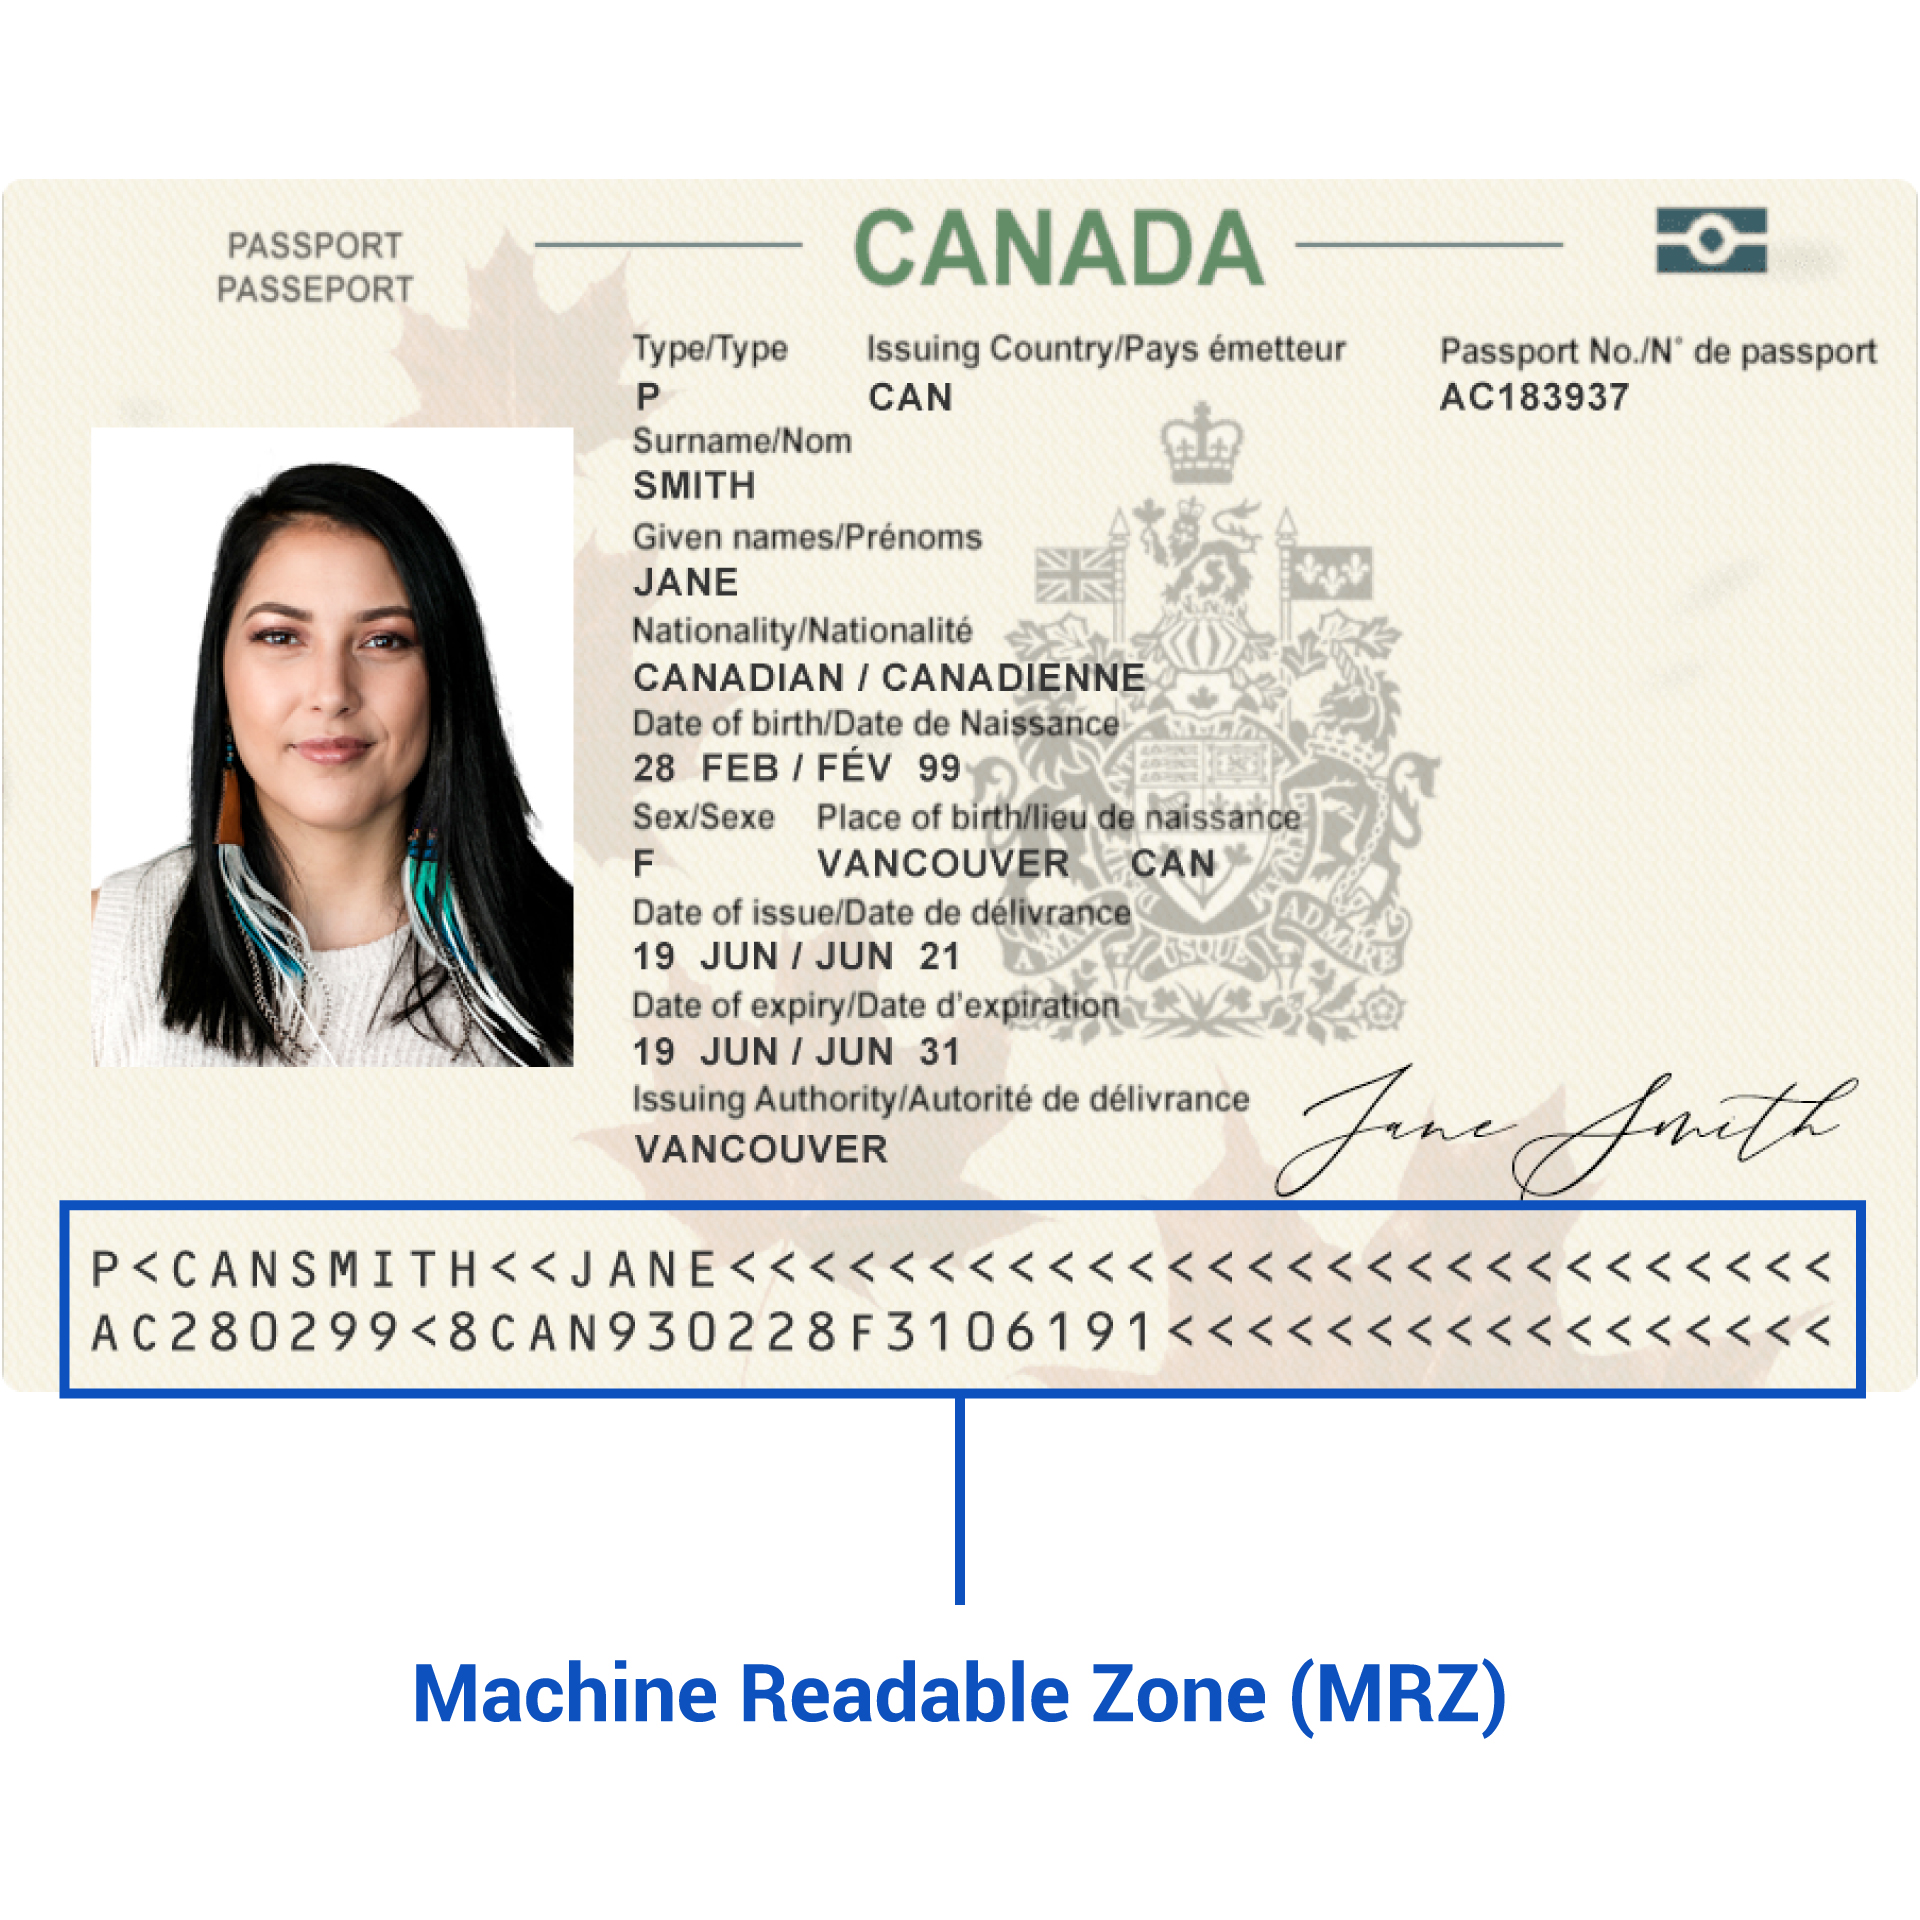
The Machine Readable Zone (MRZ) of the passport photo page
The eID-Me app will automatically find the MRZ and process the information (provided you position the passport properly within the camera view). An overlay for the camera view will help you guide the passport to the correct position.
Try to hold the passport open near the top of the page such that the page is flat (see the following diagram). A contrasting background is recommended.
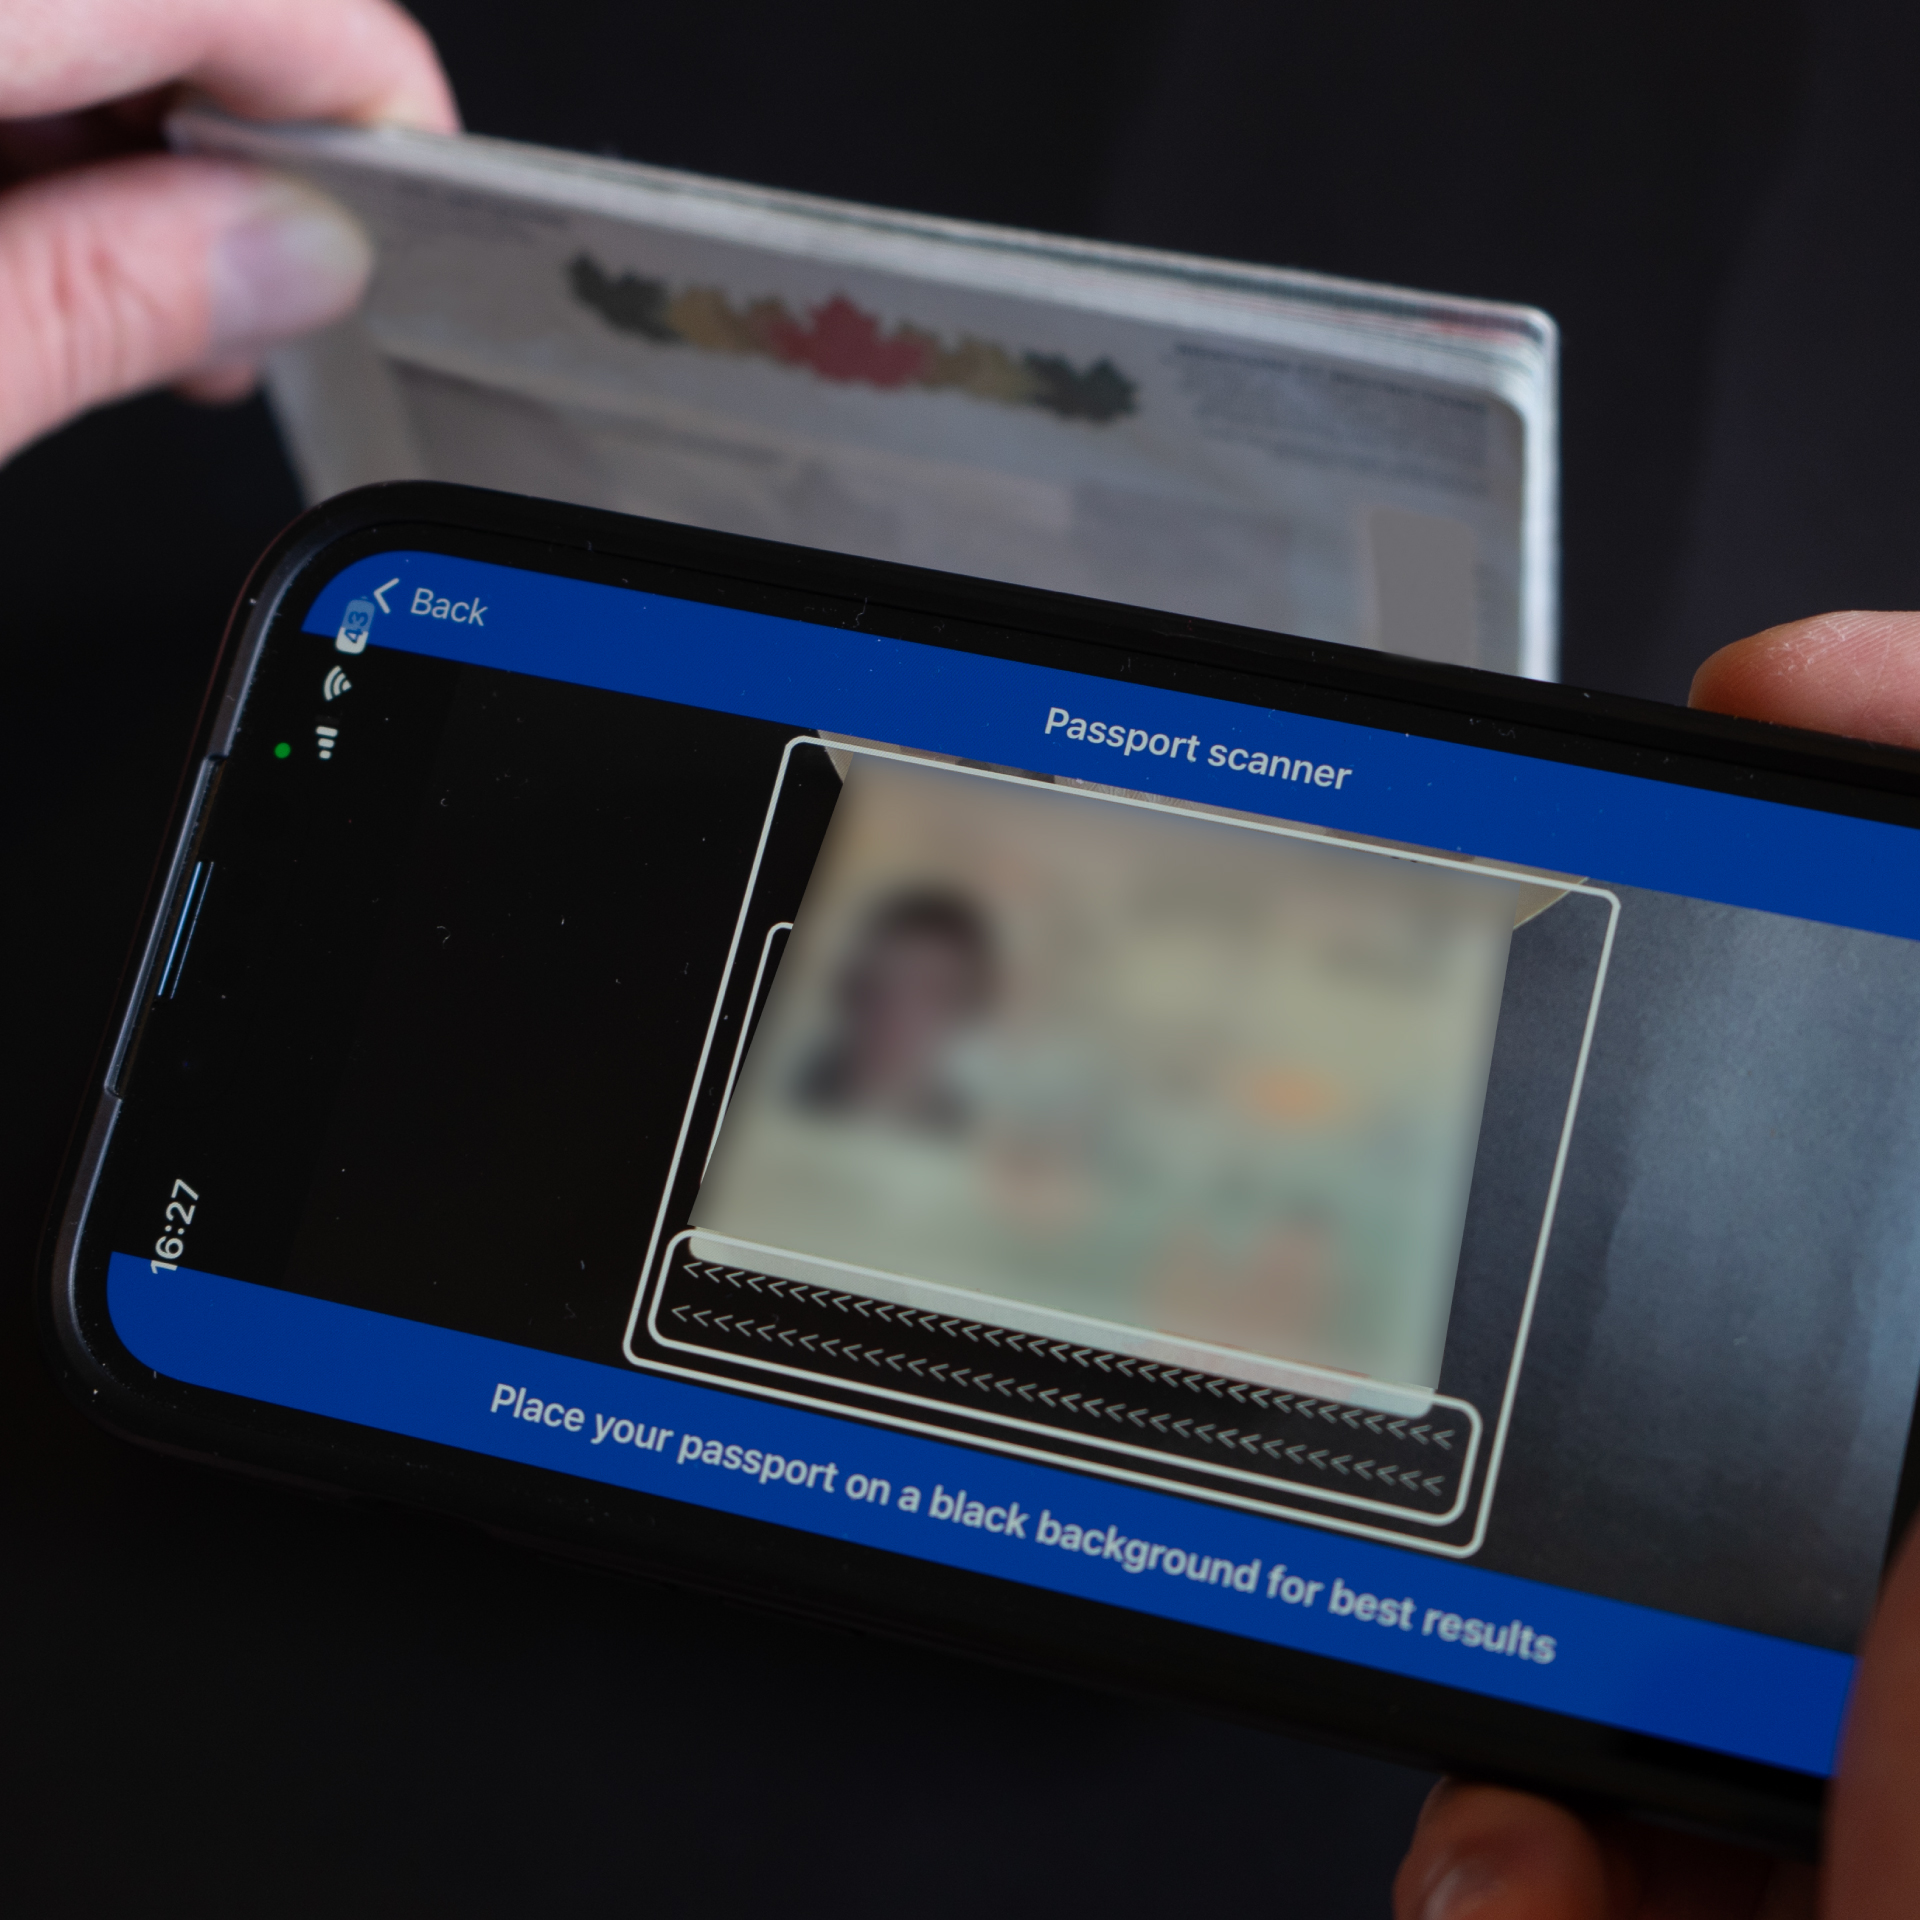
How to hold your passport for MRZ scanning
Many passports have a glossy coating on this page. It is important to try and minimize the glare that can occur due to this glossy finish. If you see glare on the page, try to change the orientation or position to remove any reflections of light.
Here are some suggestions to improve scanning results:
- Ensure the photo page of the passport is showing.
- Ensure your passport is clean. eID-Me processes fine details on your passport such as the portrait photograph, MRZ, logos, and 2D barcodes. Dirt or damage on the passport may cause the capture process to fail.
- Ensure the passport is placed against a contrasting background. The background surface should be clear of any clutter.
- Ensure there is adequate lighting. The capture process may also fail if the lighting is too dark. The camera flash is not recommended to be used because this will cause glare, so you must find a location where there is good lighting.
- Ensure there is no glare from strong light sources. The capture process may fail if there are reflections or glare from strong light sources. Try to position yourself to remove any glare from the capture process.
- Ensure that the mobile device’s camera lens is clean. Dust or grime on your mobile device’s camera lens will impede eID-Me’s ability to accurately process some of the fine details of your identity documents. The lens can be cleaned by gently wiping it with a microfibre cloth.
Scanning your passport chip (via NFC)
Once the MRZ has been successfully scanned, the next step is to scan the stored information from the passport chip via near-field communication (NFC). On a Canadian passport, the chip is located on the back cover (for pre-2024 passports), or on a data page (page 1, for 2024 and newer passports). For the best results in doing the NFC scan, follow these steps:
- If you have a mobile device case or passport case, you may need to remove them to improve your chances of scanning successfully.
- Do not start the NFC scan until your mobile device is properly positioned (see the next steps).
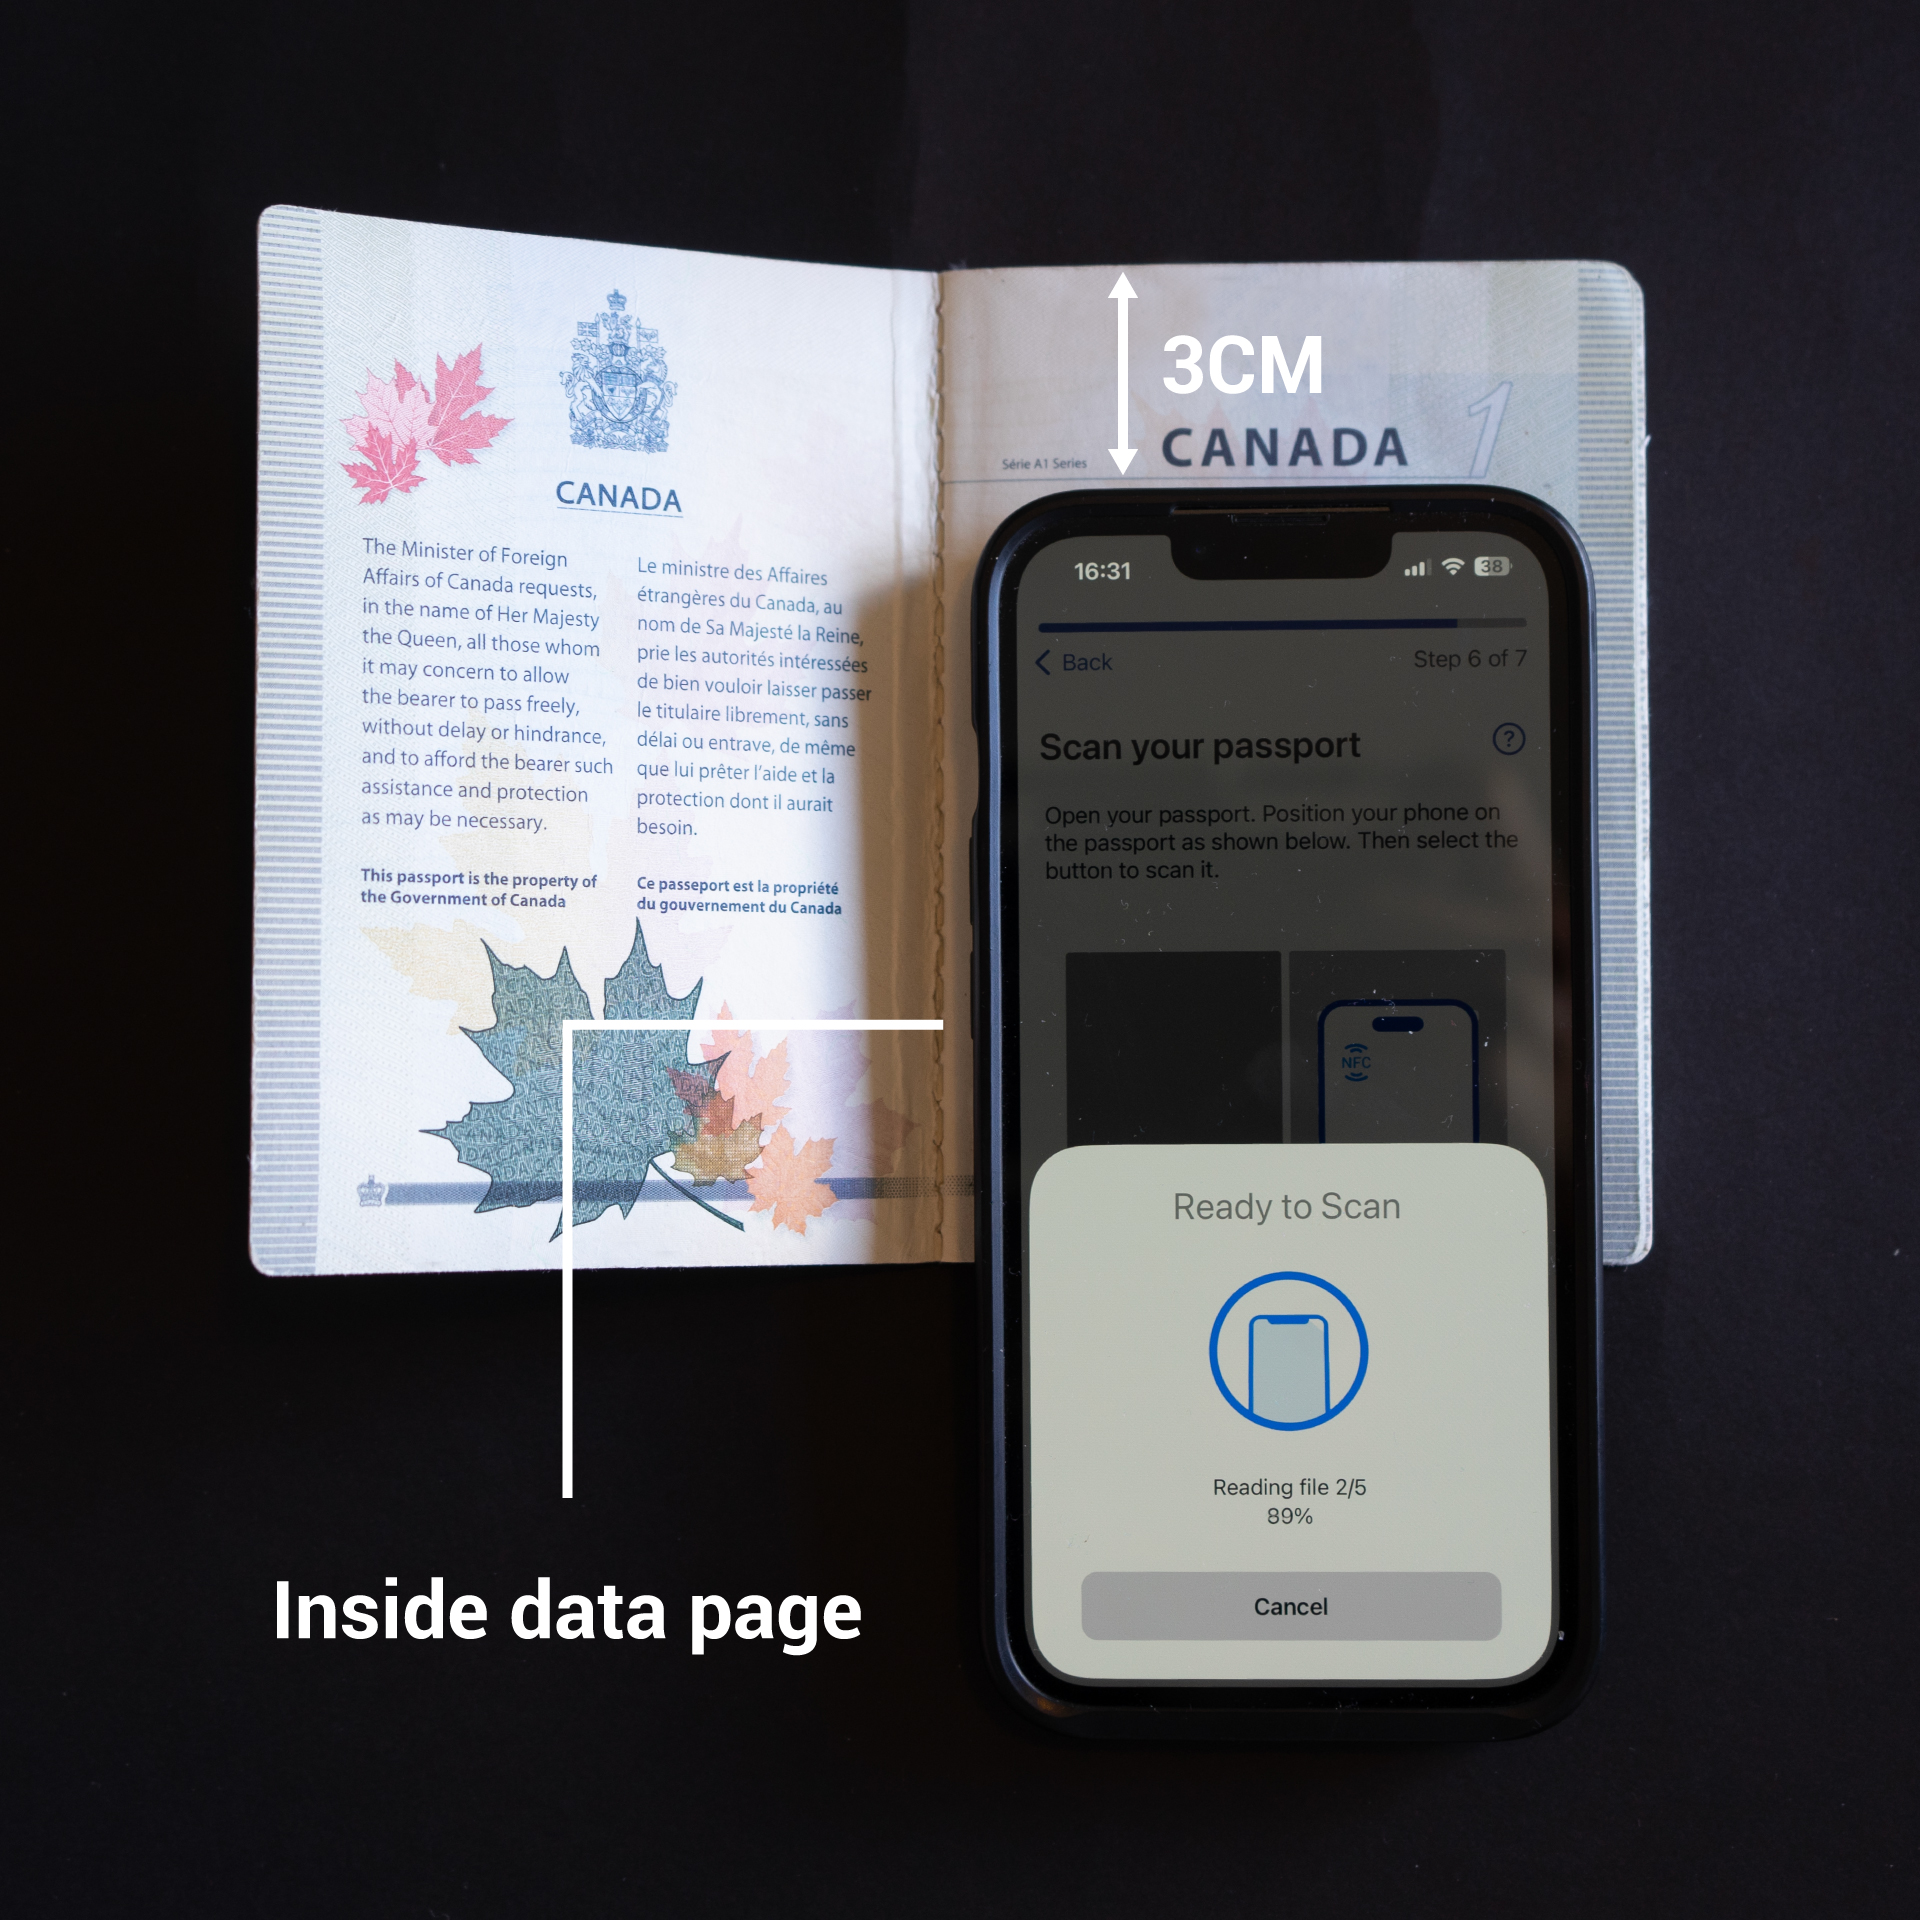
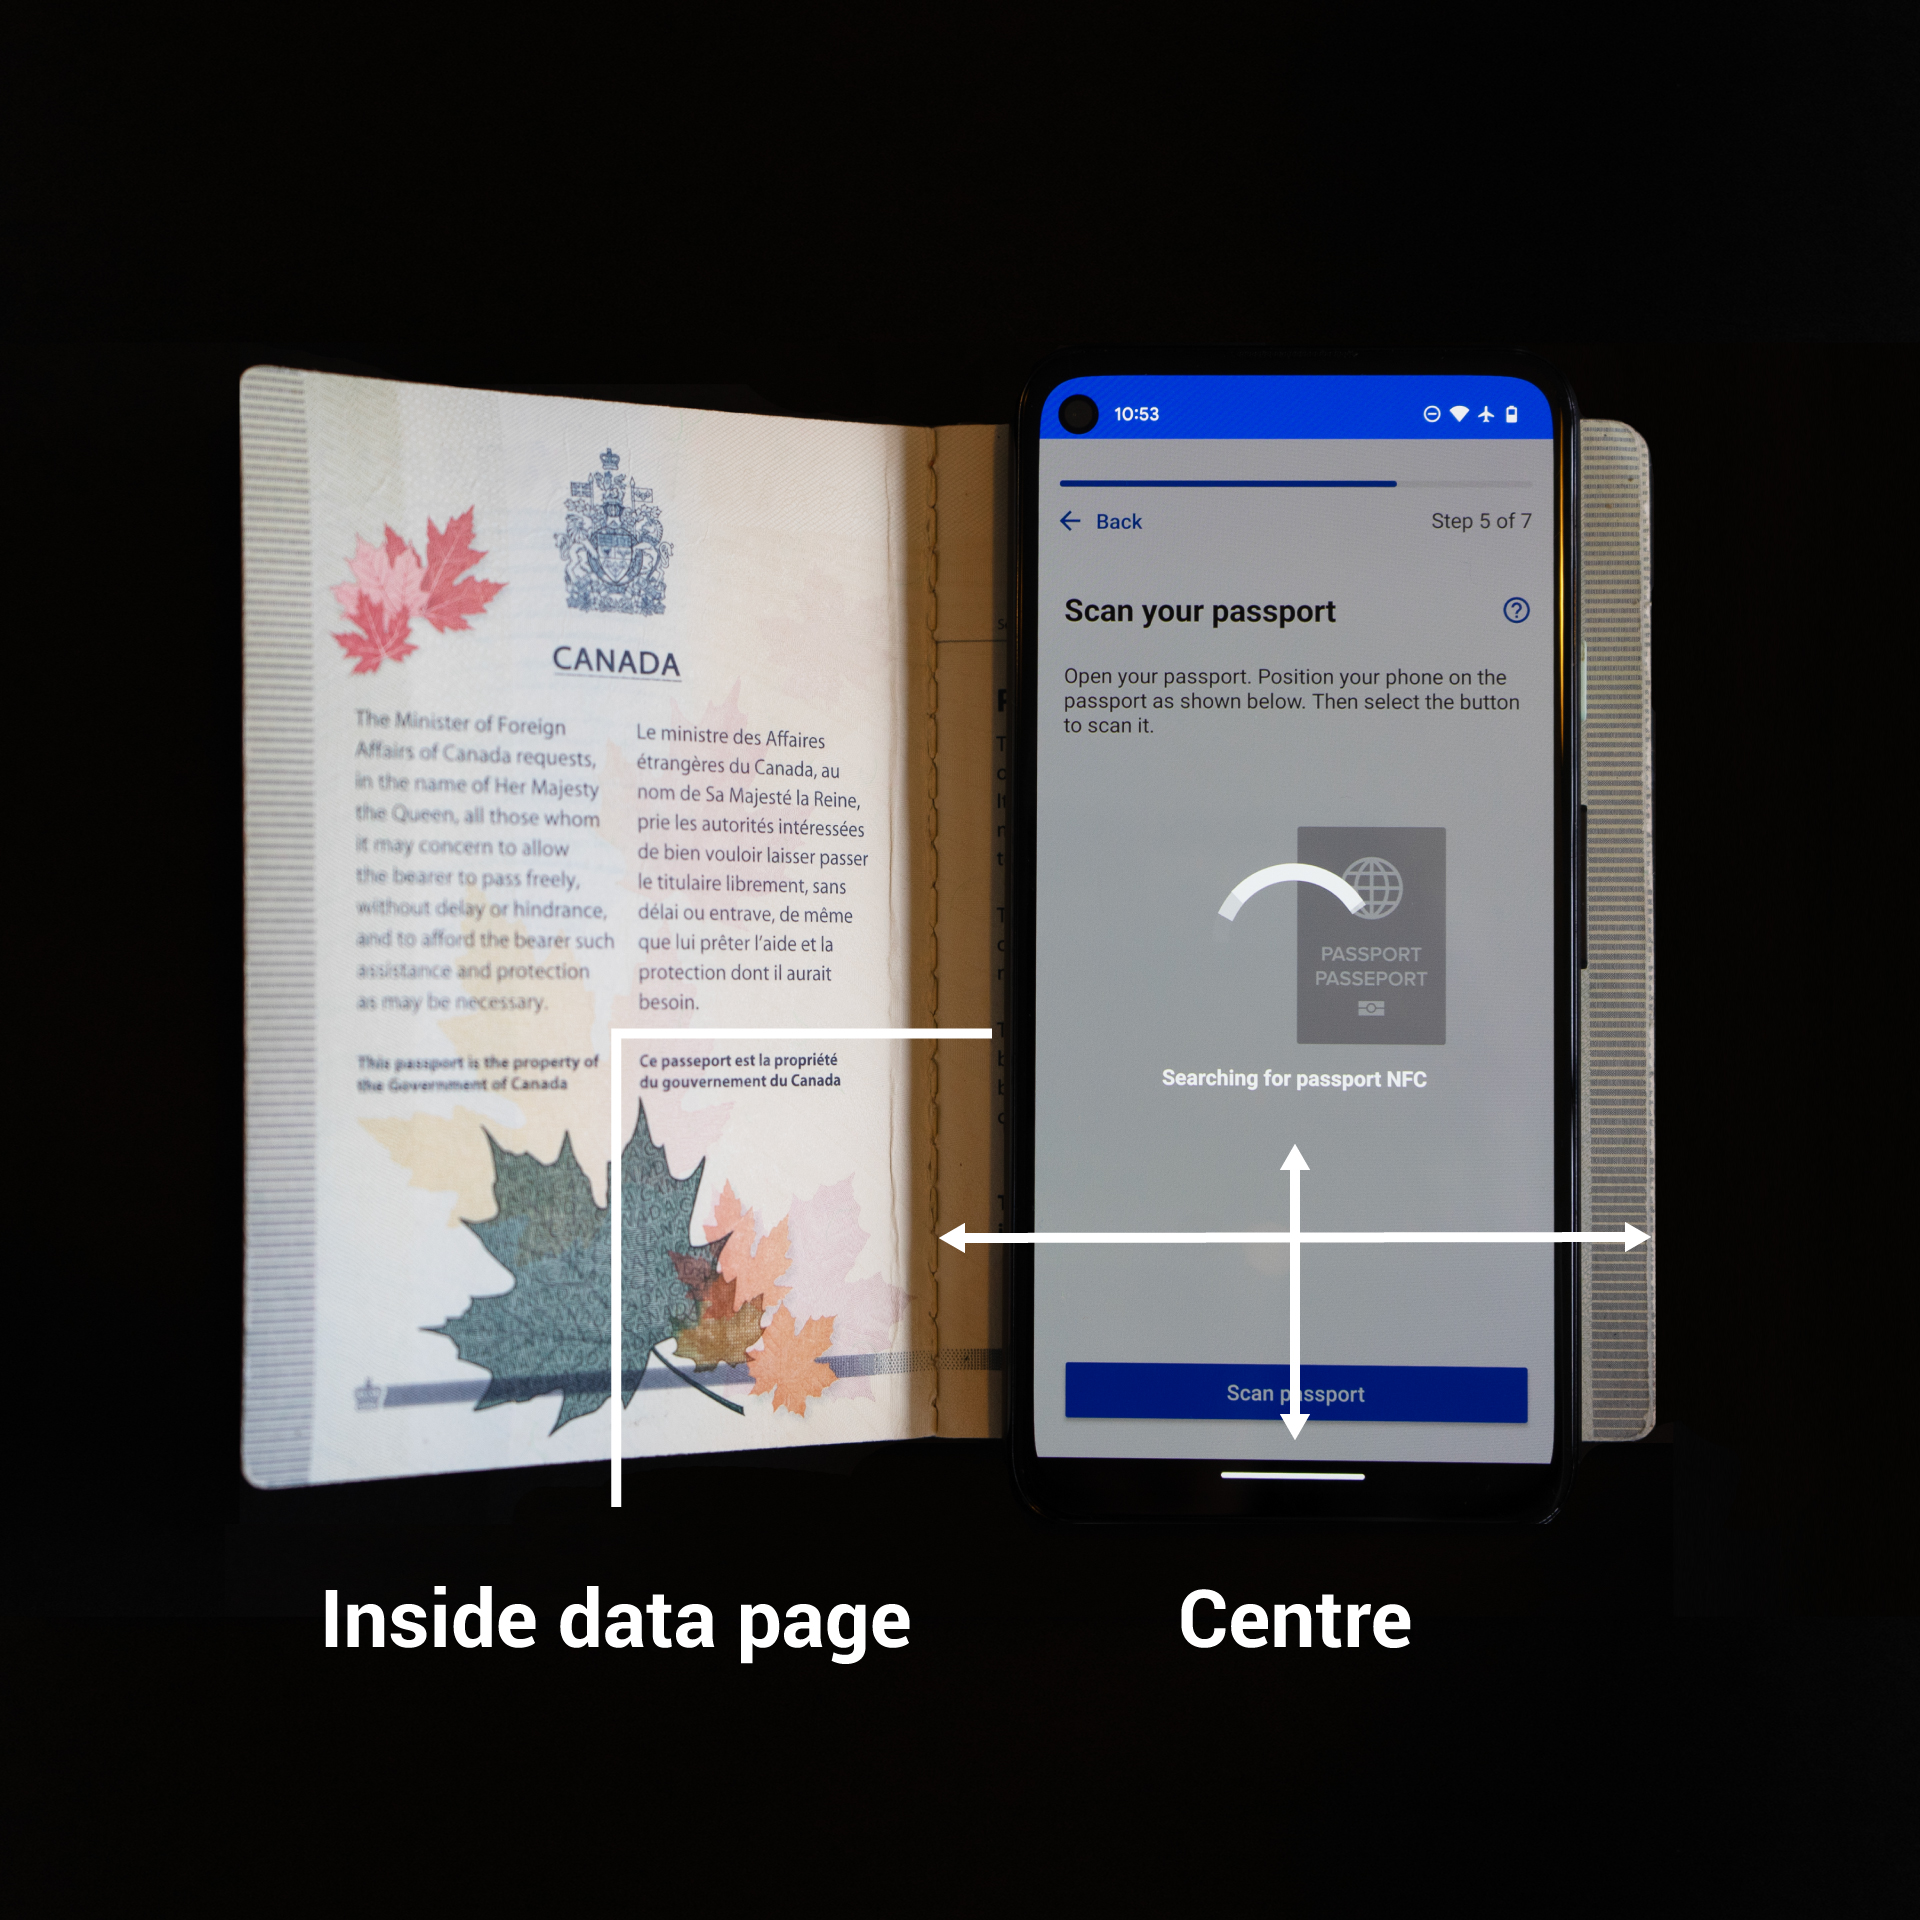
- Open your passport. Position your phone on the passport as shown in the animation on the screen.
- Tightly place your mobile device directly on the inside data page with the top of the mobile device slightly below the top of your passport (about 3 cm down) for iOS, or right in the centre of your passport for Android (see photos below).
- Once in position, select the "Scan Passport" button without moving your mobile device. The scanning operation should take about three seconds. If the scan fails, move your mobile device down a centimetre for iOS, or up/down a centimetre for Android and try again. (It is important to not move the mobile device during the scan operation.) Repeat this step until the top/bottom of your mobile device reaches the bottom/top of your passport. If the scan still has not succeeded, please go back and repeat the MRZ code scan on the passport photo page, and try scanning your passport chip again.
The eID-Me app displays an animation indicating the location of the passport chip for different passports. For non-Canadian passports, you may be asked to open the passport and position your mobile device on the inside data page, inside back cover, or the outside back cover. Please follow the written instructions on screen and follow the steps above for best results in doing the passport chip scan. You may need to try multiple ways to scan your passport as passports have different chip locations.
How to position your mobile device for passport chip scanning (iOS)
How to position your mobile device for passport chip scanning (Android)
Change name order
The order of the parts of your name may be inconsistent between different scanned identity documents. Your name order has to be consistent and accurate before you submit to increase your likelihood of passing identity verification.
Select ‘Change name order’ and then hold the icon located to the right of each part of your name and drag it to its correct location. Select ‘Done’ to save and return to the submission screen.
Submitting for identity verification
The submitted identity information is checked for integrity, consistency, and accuracy. A biometric face comparison is performed between your selfie and portrait images obtained from your identity documents.
Identity verification results
Identity verification encompasses a variety of different measures derived from the information you submit. These measures are combined to produce an overall result. After submission, the results from the eID-Me identity verification server are displayed. You will see an overall submission pass or fail, which determines if a digital identity can be issued on your mobile device. If your submission failed, you will see some of the underlying measures listed below. This breakdown is meant to help you understand why a failure may have occurred, and what you can do to try passing identity verification.
Address verification
Some of the information provided did not match what is on record with verification sources such as credit bureaus or phone companies. Confirm that the information is correct and up to date before trying again.
Closeness to home
Your current location is too far from your provided home address. Go to your home address before trying again.
Date of birth verification
Some of the information provided did not match what is on record with verification sources such as credit bureaus or phone companies. Confirm that the information is correct and up to date, and scan a passport if you have not done so before trying again.
Document consistency
The consistency or authenticity of one or more of the submitted identity documents could not be verified. Rescan your identity documents, confirm that the information on the submitted identity documents matches, and confirm your name order before trying again.
Document date validity
One or more of the submitted identity documents have expired or have an invalid issue date. Delete any expired or invalid identity documents before trying again.
Name verification
Some of the information provided did not match what is on record with verification sources such as credit bureaus or phone companies. Confirm that the information is correct and up to date, and scan a passport if you have not done so before trying again.
Number of high assurance documents
The number of high assurance documents provided is insufficient. Confirm all of your identity documents are valid and scan a passport if you have not done so before trying again.
Number of identity documents
The number of identity documents provided is insufficient. Confirm all of your identity documents are valid and that you have scanned the required number of identity documents before trying again.
Passport verification
The passport information was inconsistent or was not signed properly by a trusted authority. Rescan your passport before trying again.
Selfie match
Your selfie did not sufficiently match the photos obtained from your identity documents. It is possible that some of your portrait photos from identity cards (such as driver’s licence photo) do not resemble your current appearance or are of insufficient quality to perform an accurate comparison.
You can try to improve the biometric match by retaking your selfie and ensuring that the lighting is good, you are not wearing glasses, and your facial expression is neutral. You can also try to recapture the photos of your identity cards (not the passport) with better quality lighting.
Identity issuance
If all of these identity verification checks pass, then you will be issued an eID-Me digital identity (your eID). Success!
A private key that proves that you own this identity is generated in your mobile device and never leaves your mobile device. This is the only place where the private key exists. Only you, and no one else, can assert claims from your eID-Me identity.
You can view your digital identity card (which contains your eID, e.g., pos614) from the main screen of your eID-Me app. You can also view details of your eID by selecting the digital identity card and selecting the “Details” tab.
After your eID is issued, all of your identity data is erased on the eID-Me servers. The only information remaining on the eID-Me servers is your anonymous eID-Me identifier and your registered mobile device push notification token.
Updating documents
If you wish to update your documents (e.g., adding an ID card/passport, or updating an old to new ID card), you will be required to perform identity verification again.
Select the type of document you wish to add from the list. Then, proceed with scanning your identity documents like you have before. If all of these identity verification checks pass, then you will be issued an eID-Me digital identity (your eID) once again.
Transferring your eID
If you wish to transfer your eID to another mobile device, select the “More” icon on the top right corner of the main screen, and select “Transfer”. Confirm the action, as any existing eID information will be erased from this mobile device after a successful transfer. An email will be sent to your registered email address with instructions on how to transfer your eID.
To transfer your eID, you will need to install the eID-Me app on your new mobile device. Open the eID Transfer email on your new mobile device, and select “Transfer now”. Follow the instructions in the new eID-Me app to take a selfie for identity verification.
Here are some suggestions to ensure a successful transfer:
- Complete the transfer process within 10 minutes.
- Ensure your network is not interrupted. Make sure both your old and new mobile devices are connected to Wi-Fi or data at all times.
- Ensure you are only transferring your eID to one new mobile device.
- Ensure your old and new eID-Me mobile apps are unlocked and running in the foreground.
- Ensure your face in the captured selfie appears clearly and is centred.
Once successful, your eID will be transferred. You can now use your eID from your new mobile device for transactions.
Deleting your eID
If you wish to delete your eID, select the “More” icon on the top right corner of the main screen, and select “Delete”. Once you confirm the deletion of your eID, you will never be able to retrieve your digital identity information and eID again from the eID-Me app.
If you wish to register for an eID again, you will need to resubmit your identity information for identity verification.
Transaction history
Your identity verification transaction history is stored locally in the “Latest Transactions” section in your eID-Me app. You can view your latest transactions by selecting the digital identity card on the main screen and selecting the “View” tab.
Online usage
The websites that can use eID-Me for online transactions are called “relying parties.”
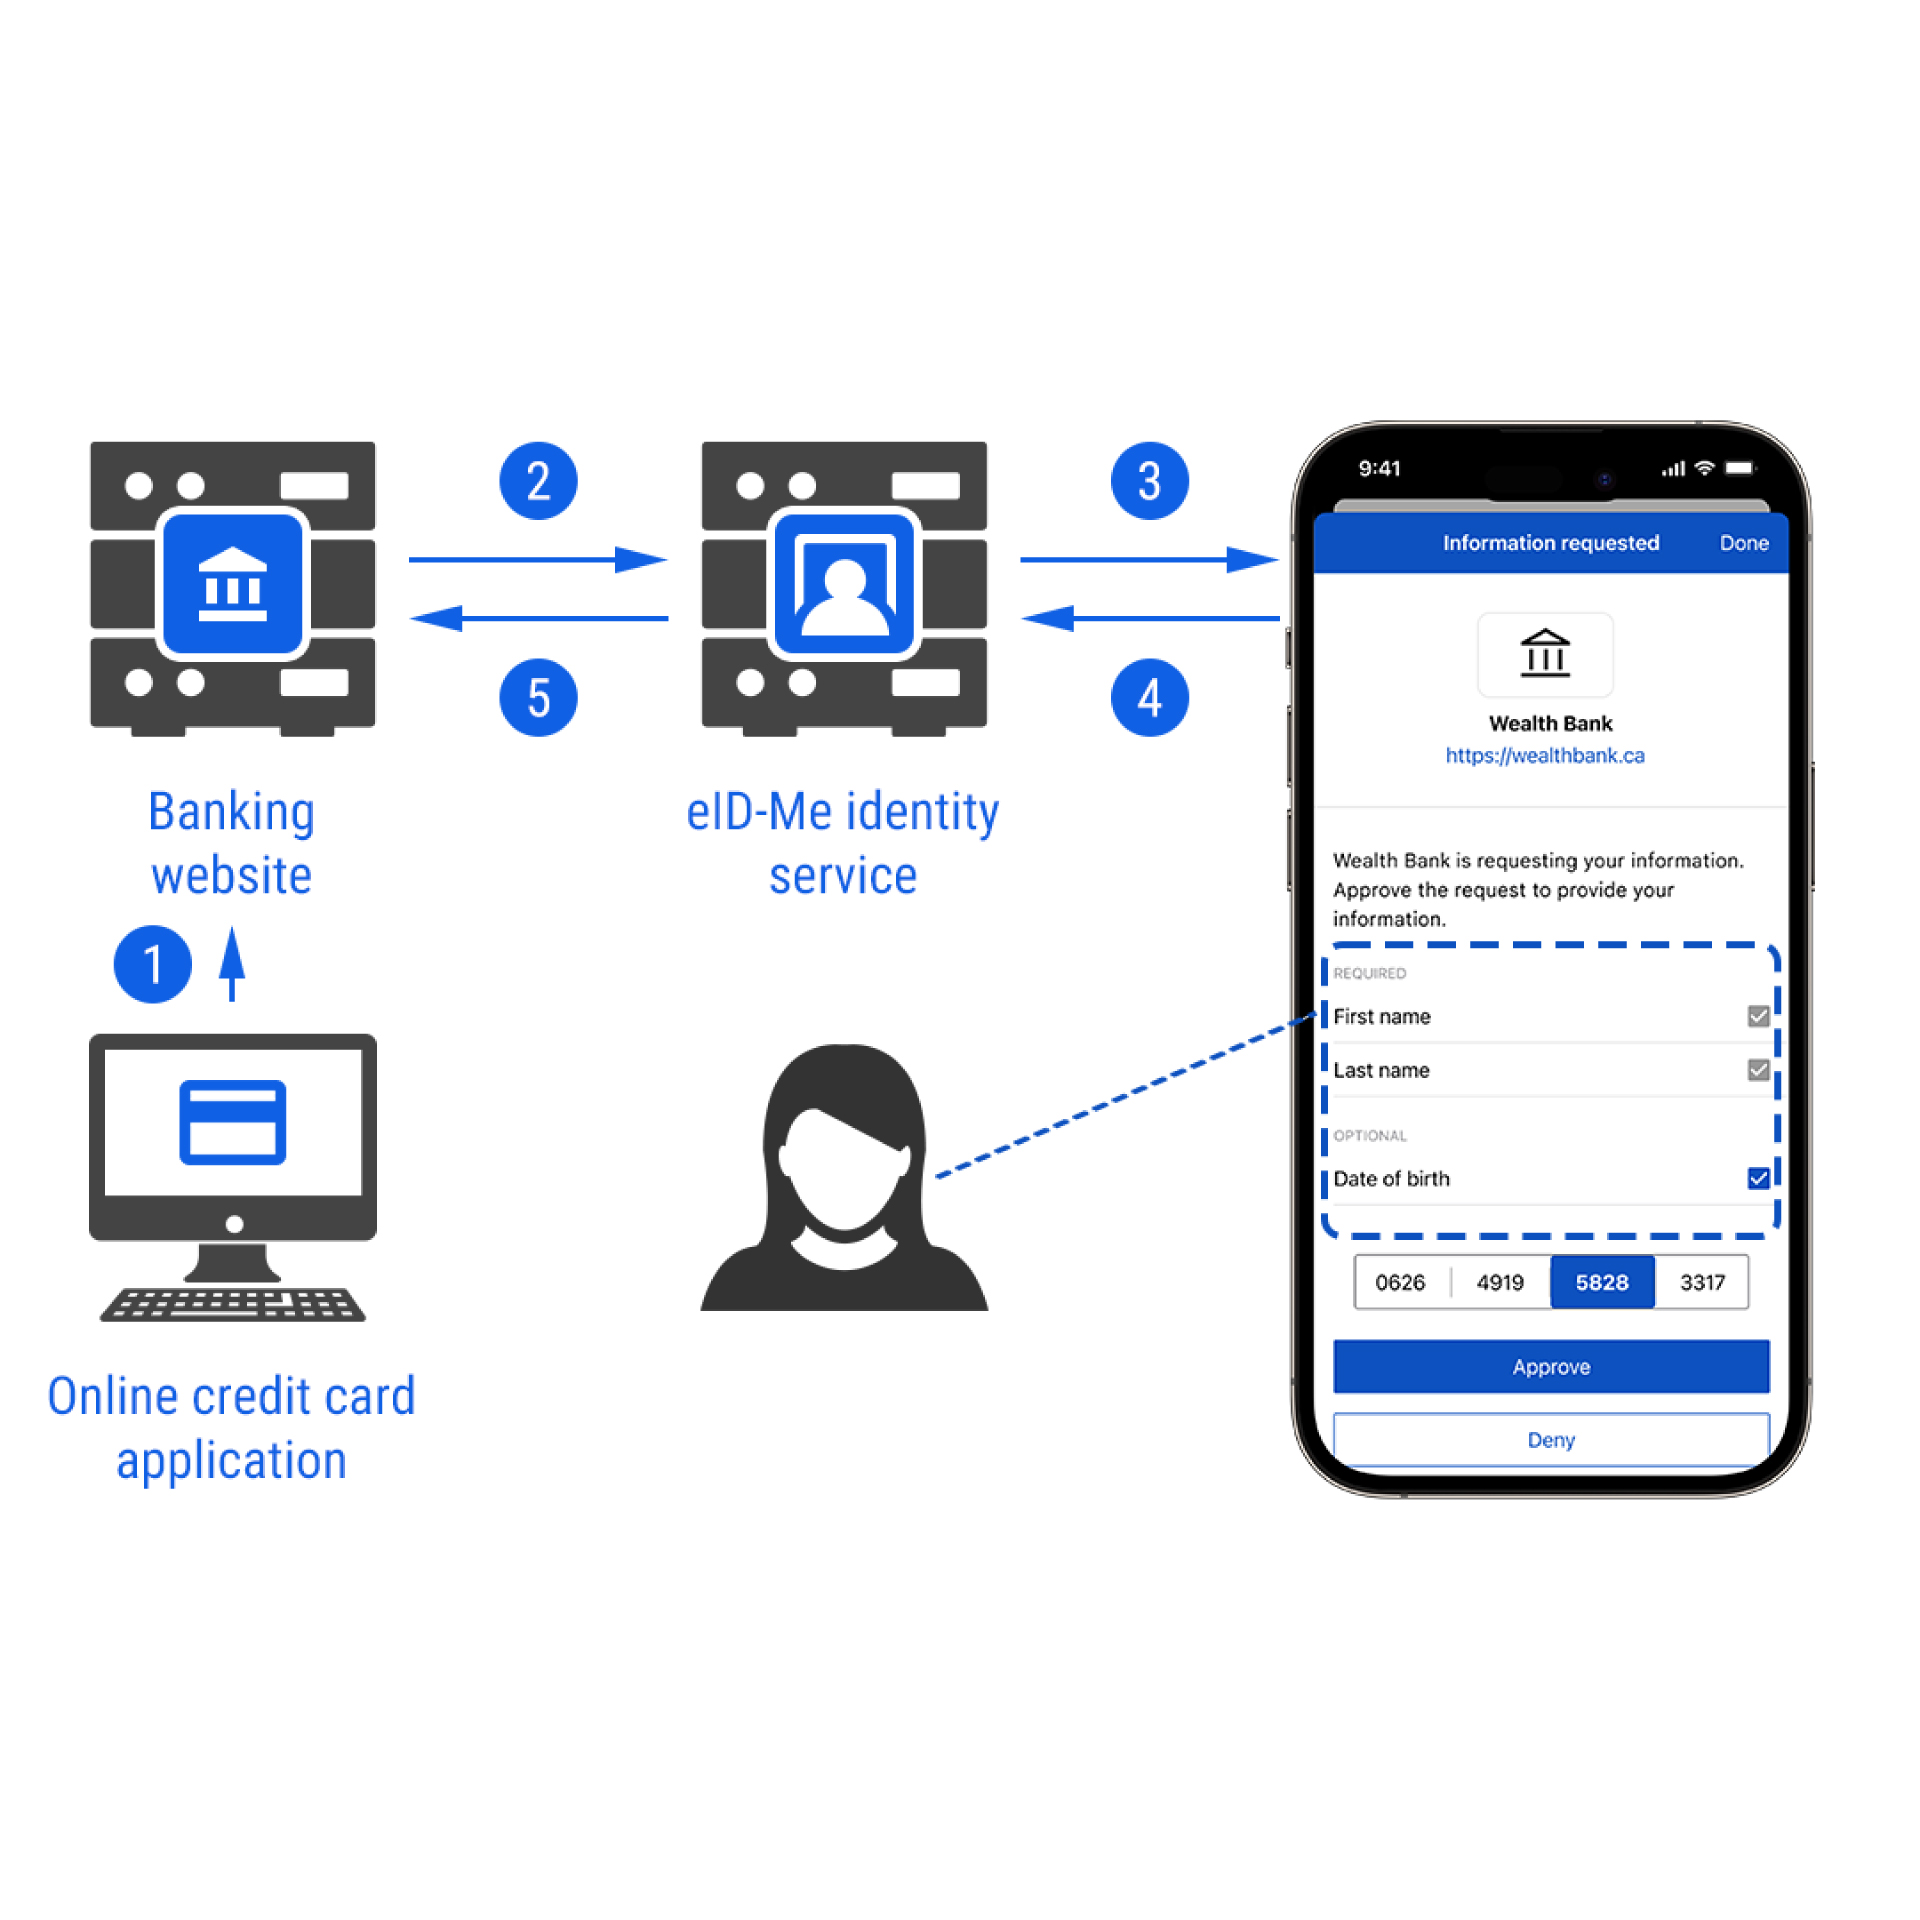
Online identity transaction flow
Referring to the above diagram, a typical online transaction with eID-Me works as follows:
- Visit an eID-Me enabled website and initiate a transaction (by selecting a “Sign in with eID-Me” button or entering your username/email into the login field).
- The relying party’s service contacts eID-Me via a federation protocol, which displays an eID-Me login form on the website. Type in your eID (located on the digital identity card on the main screen of your eID-Me app), and hit enter.
- The eID-Me Identity Provider sends an encrypted message to your mobile device for you to view and approve. The name of the relying party making the request as well as what information they are asking for is clearly shown for your approval. You may select any additional optional information you wish to share with the relying party. To approve the request, you must select the correct 4-digit anti-phishing code (from four choices) in the request. The correct code is clearly displayed in the eID-Me login form on the website.
- After confirming the transaction, the result is digitally signed by the eID-Me identity private key.
- After verifying the result, the requested claims are returned to the relying party, and you get access to the relying party’s services.
Note that some claims are mandatory and others are optional. You can also choose to provide any additional optional information, or deny the identity transaction completely if you feel the relying party is asking for more information than you wish to share.
Offline (in-person) usage (coming soon)
eID-Me can also be used for offline (in-person) transactions as illustrated in the following diagram.
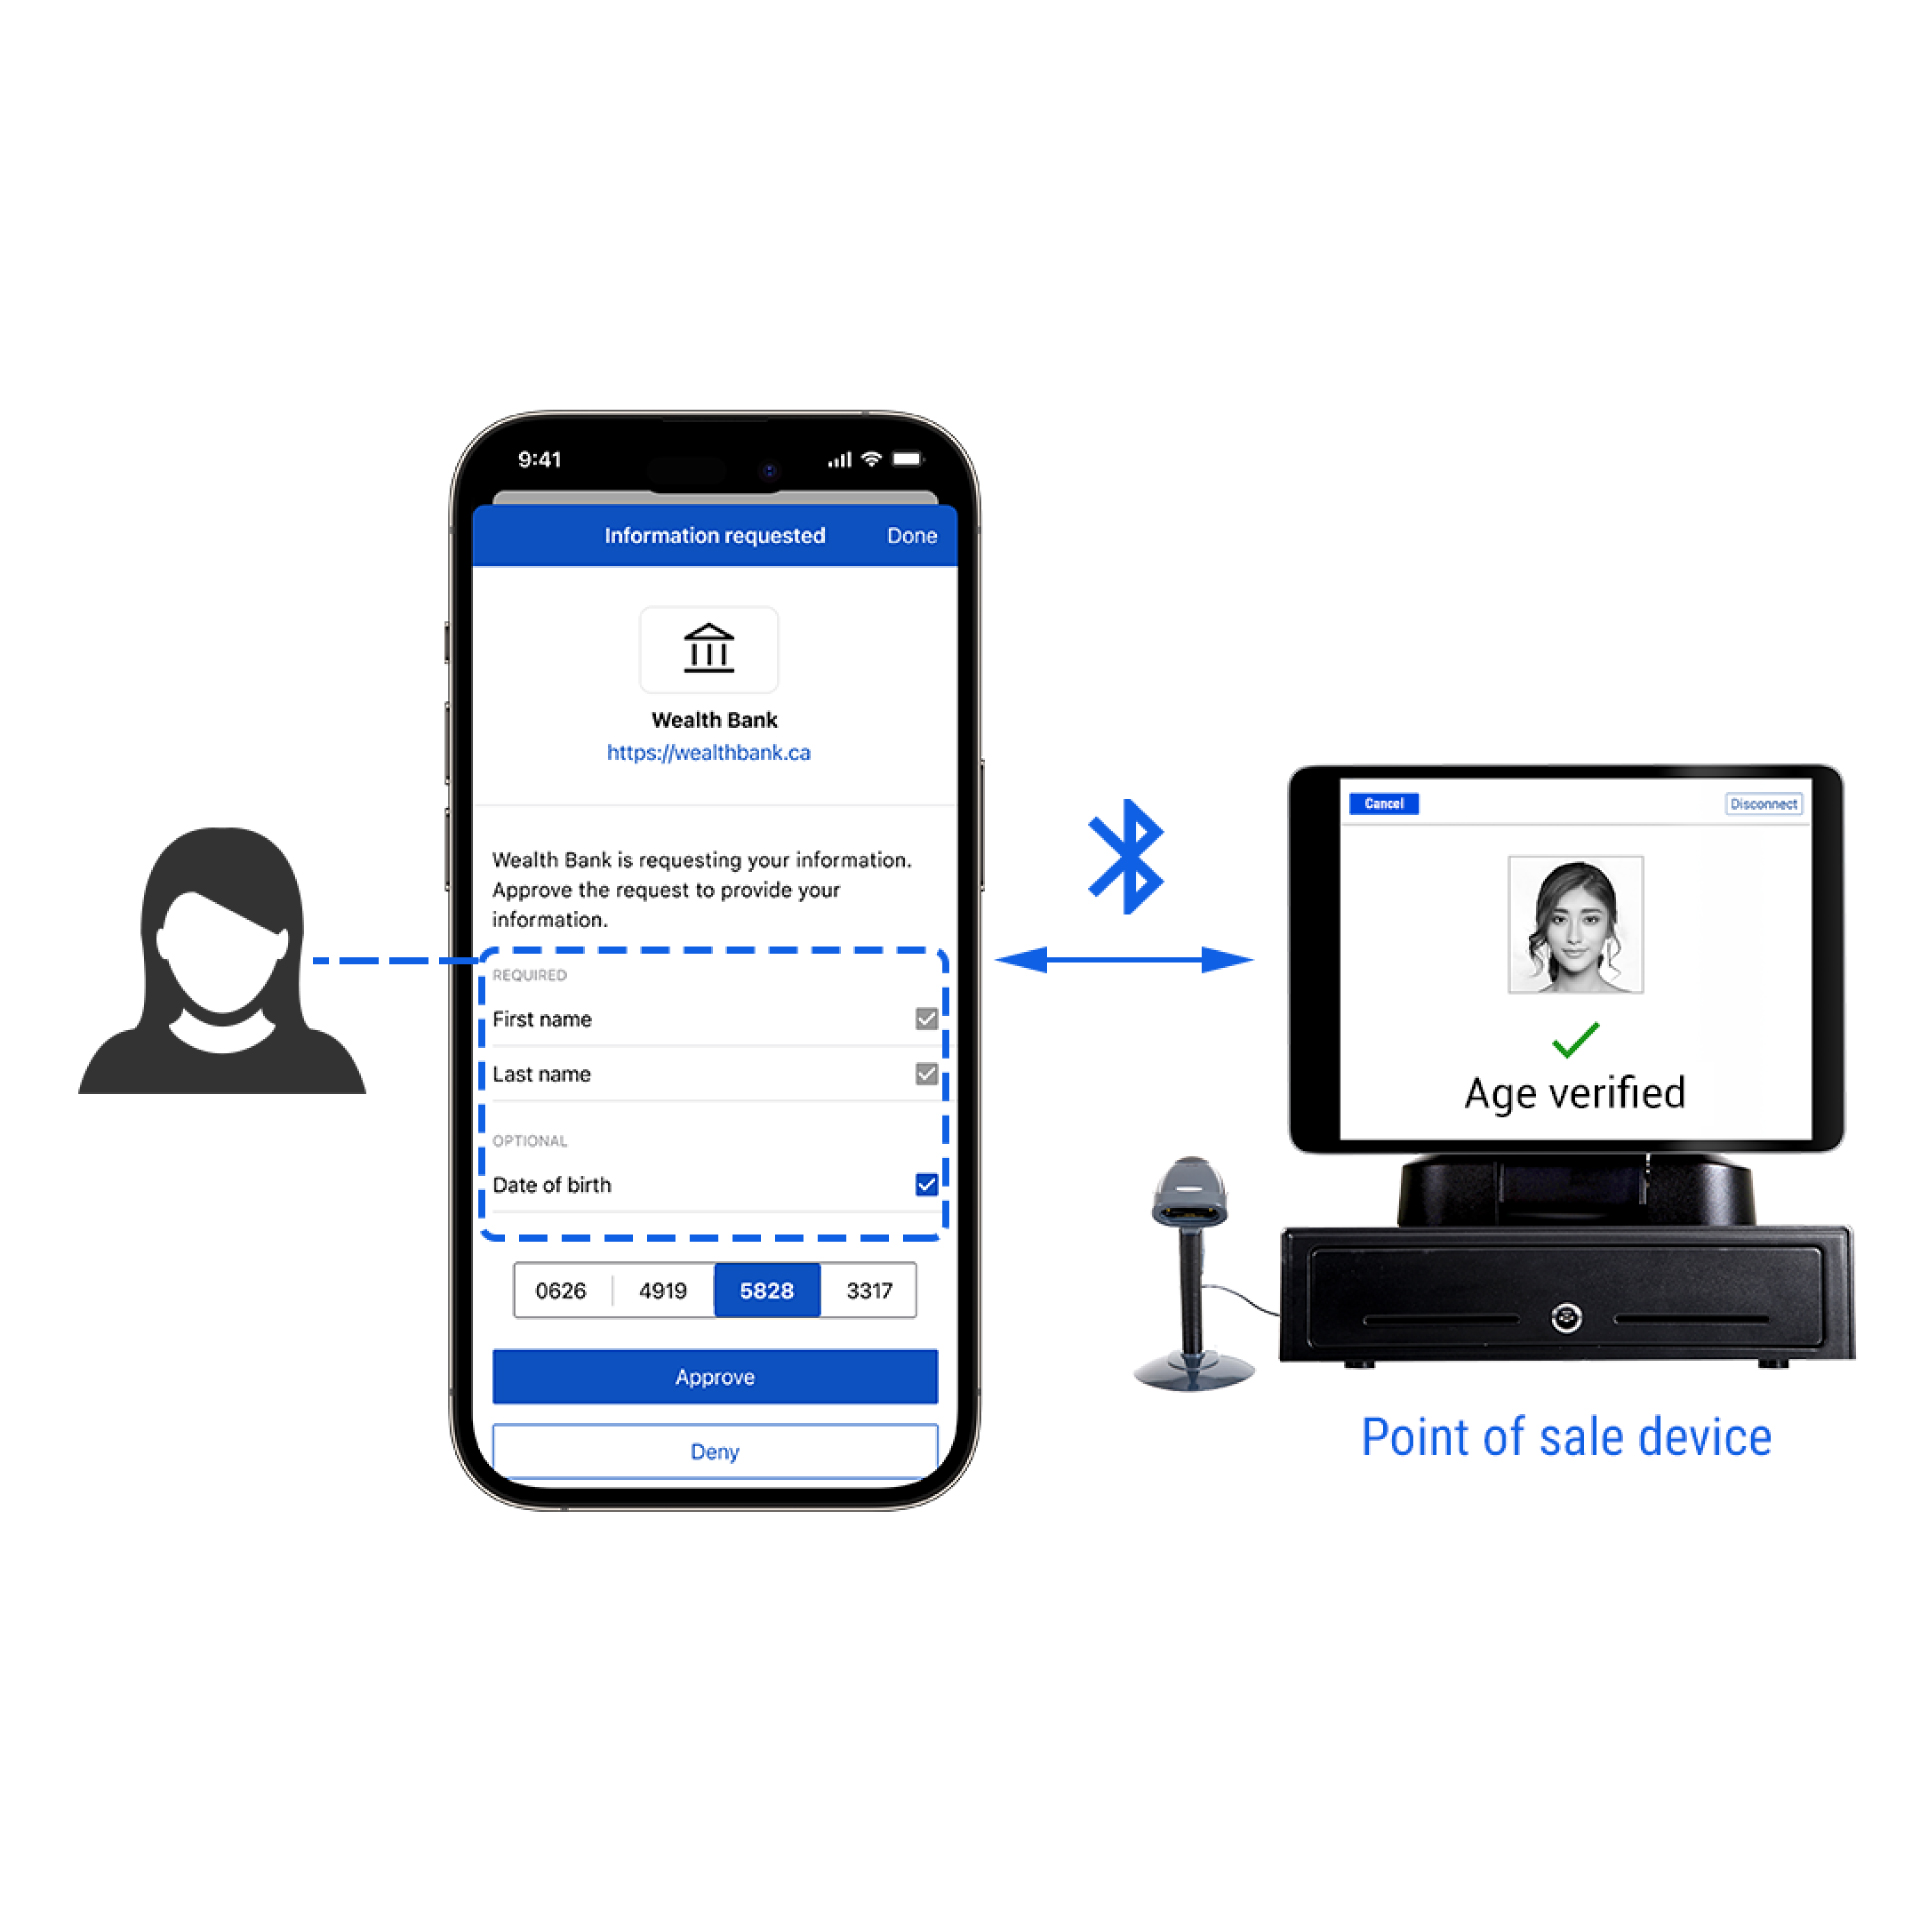
Offline (in-person) identity transaction flow
For in-person transactions, there is no eID-Me service involved. These transactions are performed directly between your mobile device and a host system (considered to be the relying party). Even though no eID-Me services are involved, the user experience is very similar to the online transaction use case.
There are many possibilities for what the host system can be, including a point of sale (POS) terminal at a retail store, a medical clinic check-in station, a police officer’s mobile device, an automobile, and a home door lock.
Enable Bluetooth connections with eID-Me
eID-Me uses Bluetooth to let you securely connect to a relying party’s system and send encrypted identity information during in-person identity transactions. See the eID-Me privacy section above for more information on identity transactions.
eID-Me privacy policy
eID-Me is designed for maximal privacy. Bluink does not retain any of your personal information except your eID-Me identifier so that your mobile device can be contacted during online transactions. For more details on your privacy with eID-Me, see our privacy policy here: https://bluink.ca/eid-me/privacy-policy.
eID-Me FAQ
Have any questions? Please check our eID-Me FAQ: https://docs.bluink.ca/eid-me/faq.html.